


What are CSS selectors, and what are they used for?
A CSS selector is a string designed to target one or more elements on a web page by specifying attributes and/or hierarchy (parents in the DOM) of the element(s). In other words, it’s a way to locate one or more elements on the page. Locating elements is necessary for a number reasons which include styling them with CSS, accessing them with JavaScript — or in our case, interacting with them in an automated browser test. Every element that you interact with in an automated test (whether it’s clicking, typing, asserting, etc.) needs to be uniquely identified so that it can be located during the test run.
In CSS, a selector is part of a css rule that applies css properties. For testing, the same idea helps you target elements in a durable way. Common families you’ll see include the element selector (also called a css element selector), class selector/css class selector, attribute selector/css attribute selector, and the id selector using a css id.
There’s no magical method for easily pinning down an element in every situation. You’re essentially building a technical “description” so that the element, or elements, can be pinpointed. In some cases, the element may have a unique attribute (like an ID) that makes this easy. In other cases, the attributes are sparse or broad and need to be chained together. Occasionally hierarchy needs to be used as well.
Think of it like this… You’re looking at a crowd full of 1,000 people. A few of these people are wearing a sticker with an ID number on it. A few others are wearing a name tag. Most don’t have either. You’re asked to verbally identify some of the people in this crowd. How do you do that? For the folks with an ID or name tag, it’s straightforward. But for those without? You need to build a list of attributes, and possibly surroundings, to identify them: “The tall, male in the blue suit next to the woman in the red dress.” In this analogy, the crowd full of 1,000 people is the DOM of a web page (full of 1,000 elements) and the verbal description is your CSS selector for targeting them. It’s a little bit like this old classic:
CSS Selector Cheat Sheet: What specific methods does CSS provide for targeting?
CSS provides a syntax for designing these selector strings by specifying attributes and hierarchy of elements so that you can match exactly the element(s) you intend. I will walk through some of the more common options in this CSS selector cheat sheet, explain the syntax, and offer thoughts on when they’re useful.
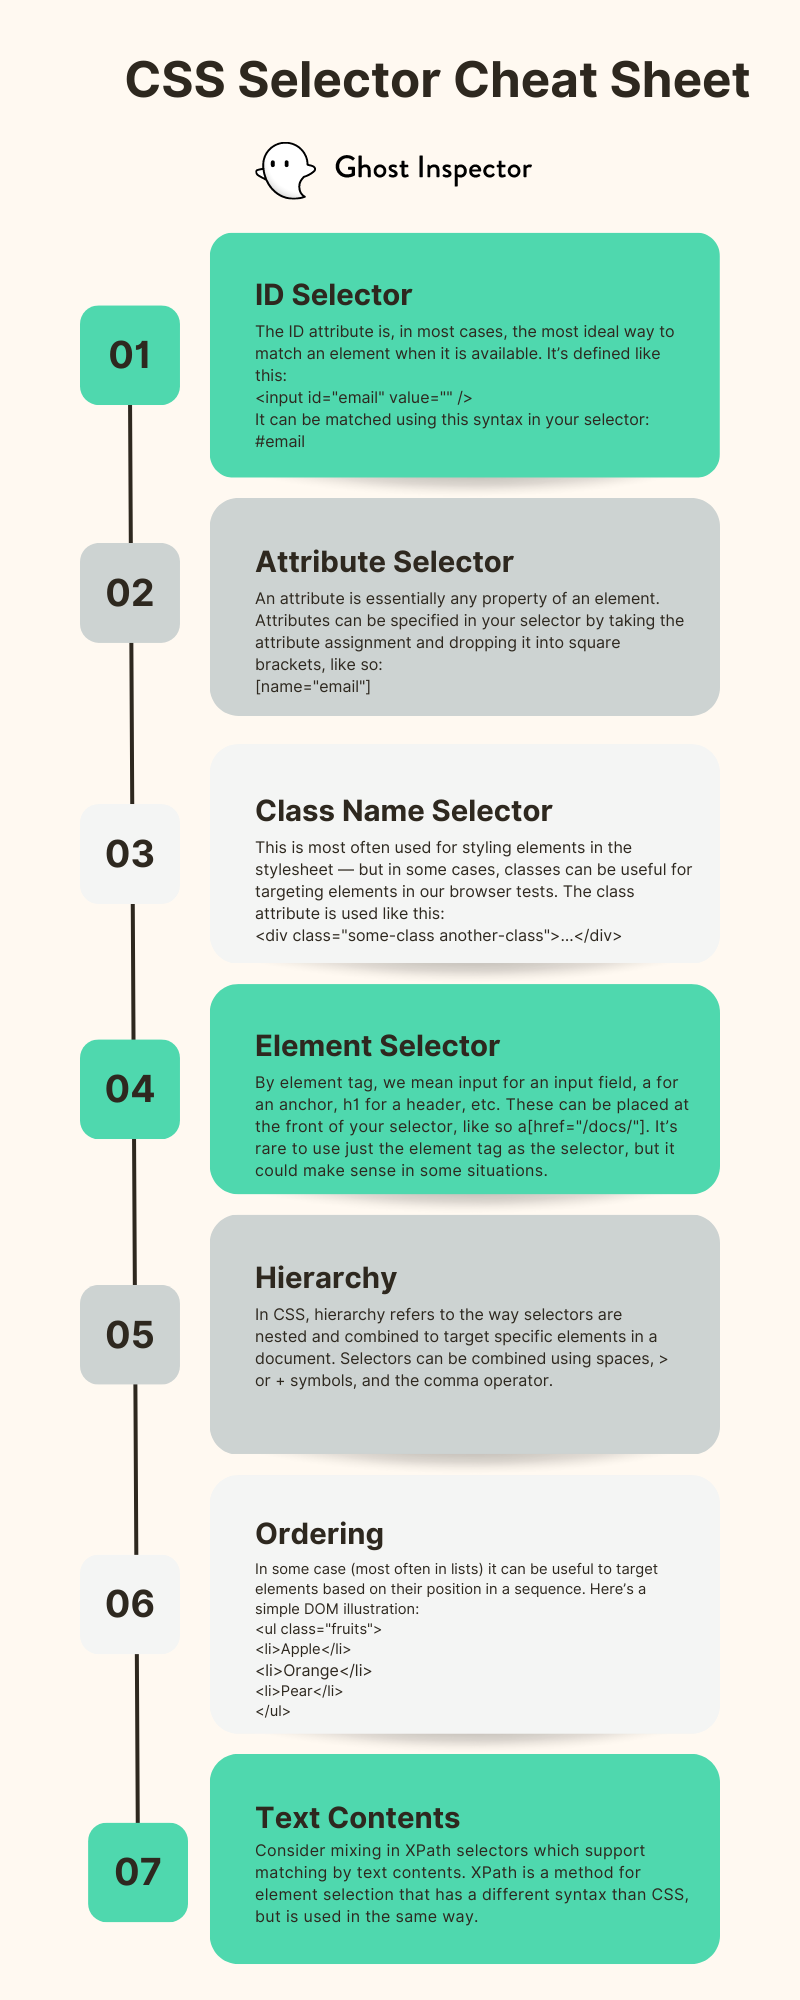
Targeting using IDs
The ID attribute is, in most cases, the most ideal way to match an element when it is available. It’s defined like this:
<input id="email" value="" />
It can be matched using this syntax in your selector:
#email
I’m just putting a # in front of whatever the id attribute is set to. Super easy. This pattern is the classic id selector. If your app provides a stable css id, it’s usually the cleanest path to a single, matching element.
In theory, IDs are unique on the page and remain static from page load to page load. This means that there should be only one element on the page with its id set to email. It also means that if I refresh the browser, that same element will still have an id set to email. When that’s the case (and it usually is), then an ID is the perfect selector to easily and clearly pinpoint an element. You should pretty much always use it when it’s available.

But, of course, there are exceptions… If you or your engineers are being naughty (tsk tsk), you may end up with more than one element on the page with the same ID. This is generally “wrong”, but I’ve seen it happen. Sometimes multiple responsive views are duplicated in the DOM which are hidden or shown depending on screen size. Other times, I’ve seen multiple login forms duplicated in the DOM which share the same IDs on their form inputs. Again, these scenarios “shouldn’t happen” but they do, so just be aware.
Another situation to be aware of is “dynamic” IDs, meaning IDs that change each time the page is loaded. That makes them useless for targeting since they’re different every time. From an engineering perspective, this isn’t an ideal use of IDs in my opinion, but I see it quite a bit. Things like this:
<input id="email-28742" value="" />
That -28742 portion is a pseudo-random number or string that changes each time the page loads… If I specify my selector as #email-28742 and run a test, the ID may be something like email-32472 when the page loads so my selector won’t find anything. Womp womp.
EmberJS is a notorious culprit here. Their framework seems to leverage dynamic IDs *a lot*… I’m sure they have a good reason for it… right? right?! Fortunately, you can work around this problem. In the case of our product, Ghost Inspector’s test recorder has some logic and options built-in to avoid dynamic IDs. You can also use the “partial matching” attribute selectors that I talk about below, or just avoid the ID entirely and locate the element using other methods.
Targeting using attributes
An attribute is essentially any property of an element. Those familiar with CSS tend to think of things like the name of an input element. For example, consider this element:
<input name="email" value="" />
Attributes can be specified in your selector by taking the attribute assignment and dropping it into square brackets, like so:
[name="email"]
That selector will look for any element on the page with a name attribute that’s set to email. Using square brackets creates an attribute selector. You can also combine multiple attributes to form a compound selector, which narrows your target down to a more specific element.
These operators are great when a value changes across environments while still pointing to the same specific html element in the html document.

Attribute selectors can be used for far more than names, however. In fact, the ID identifiers that we covered earlier are attributes themselves. The syntax in the section above is essentially shorthand. We could also match an ID using this selector [id="identifier-here"]. It’s the same as #identifier-here.
Apart from the name attribute that I’ve mentioned, other useful attributes include input type and value. For instance, to match a submit button like <input type="submit" value="Send"> or a checkbox like <input type="checkbox" value="true">, you could use [type="submit"] and [type="checkbox"], respectively (though additional identifiers may also be necessary).
The value attribute can also be useful. For instance, assume we have this in the DOM:
<input type="radio" name="point" value="1" />
<input type="radio" name="point" value="2" />
<input type="radio" name="point" value="3" />
Suppose we want to click the radio input the value of 2. This selector might work nicely:
[name="point"][value="2"]
Hey, look! I’ve got 2 sets of brackets in there! I’m matching by both name and value. Yes, you can do that. You can combine as many attributes as you want — and, you don’t need to stick to just attribute selectors either. As we explore more options and syntaxes below, you’ll see that we can do things like input[name="something"].some-class.another-class which combines element tag, attributes and classes. For now though, let’s continue talking about attributes.
In some cases, I’ve also found it useful to target elements using their placeholder attribute, which specifies the label that appears inside of an input element when it’s empty. For an element like <input name="email" placeholder="Email Address">, you might consider using the selector [placeholder="Email Address"], which is nice and semantic. I’ve seen situations where using data attributes, as in [data-something="xyz"], can be useful as well. You can get a little creative here!
So, attribute selectors are very useful when working with form elements — but they don’t stop there. They can also be used for other things, like matching the href property of anchor tags (links) on the page. A link like <a href="/docs/">Docs</a> could be matched with [href="/docs/"]. You can use attribute selectors to match any property on any type of element.
Ok, great. On to the next thing? Oooh no.

One of coolest features that attribute selectors provide (*and the most underutilized, in my opinion*) is the different operators that are available. The operator is that `=` in `[name=”email”]` which looks for a `name` attribute that is equal to *exactly* `email`. CSS provides a number of other operators that we can use to do more advanced things, like just matching a portion of the attribute.
The 3 that I use the most are ^= (match at the beginning of the attribute), $= (match at the end of the attribute), and *= (match anywhere in the attribute). Let’s look at how this works:
<a href="/user/12345/edit/">Edit User</a>
I want to target that link with a selector. The problem is, the 12345 portion is different every time because it’s a new user ID that I’m creating during the automated test itself. This means using a[href="/user/12345/edit/"] won’t work. How do I get around it? I match the beginning and end of the link URL, like this:
a[href^="/user/"][href$="/edit/"]
See what I did there? We’ve “weeded out” the dynamic part. Now I’m just looking for /user/ at the front of the URL using ^= and /edit/ at the end using $=. This is very, very powerful especially in automated testing! Let’s look at another example:
<a href="https://staging.company.com/dashboard/?session=3284792">Dashboard</a>
Now we’ve got a URL with a domain in front and a dynamic session ID at the end. Obviously I can’t have that session ID in my selector, since it changes. But, to add another twist, suppose I’m building an automated test that I want to run on multiple environments — not just staging.company.com but also www.company.com and others. I want to take that domain out of the selector as well. I can do this:
a[href*="/dashboard/"]
This time I’m using *= to just look for /dashboard/ anywhere in the URL.
Attribute selectors can also be used deal with the dynamic ID problem that I mentioned above. The example element I used <input id="email-28742" value=""> could be matched with [id^="email"] to ignore the dynamic portion.
This is about as close as CSS gets to “regex” type matching so make a note of this functionality and use it wisely. It’s very useful for making your anchor selectors more durable, among other things.
Targeting using class names
Elements can have a class attribute that contains a space-separated list of defined “classifications” that apply to the element. This is a class selector, sometimes referred to as a css class selector. It matches any element that carries that class.
Broad classes are very common for css style and layout frameworks like css grid, but they can be noisy for tests. Class names are most often used for styling in a stylesheet, but in some cases they can also provide a reliable way to target elements in automated browser tests. The class attribute is used like this:
<div class="some-class another-class">…</div>
To match that element using a class name, we use this syntax in our selector: .some-class. We could also require both classes for the match, combining them like this: .some-class.another-class. As with IDs, classes are just another type of attribute, so the .class-name syntax is essentially shorthand for this: [class*="class-name"]
We need to be picky about using classes in selectors because, in most cases, they’re designed to apply to groups of elements — not just one. Since we’re generally interested in matching a specific element with our selector, adding broad class names which apply to lots of elements (for example, Bootstrap’s .form-control class which gets applied to all form inputs) isn’t very helpful. It just clutters up the selector without making it any more specific.
You’ll also want to avoid classes that look temporary or are very style-oriented. For instance, a “grid” class like .col-md-1 could easily change to .col-md-2, so it’s probably not a great idea to use it in your selector. Some JavaScript frameworks will clutter up classes with dynamic stuff as well. For instance, AngularJS adds a ton of .ng-whatever type class names. I’d recommend avoiding those in your selectors as well.
With that said, some classes can be useful especially when they provide a good amount of specificity or semantic value. If you’re interacting with a form on a page that has a number of buttons, but just one with a .btn-submit class, that might make a good selector. If you’re interacting with a large form that has multiple sections with different class names, using something like .intro-section within your selector might help with specificity (see the hierarchy section below).
Targeting using element tags
By element tag, I mean input for a field, a for a link, or h1 for a header. This is called an element selector or type selector, since it uses the element name directly. Being explicit about the tag can improve clarity for teammates, even if it doesn’t change what the selector selects elements for.
These can be placed at the front of your selector, like so a[href="/docs/"]. It’s rare to use just the element tag as the selector, but it could make sense in some situations. For instance, suppose your page has a single <h1>…</h1> element and you want to assert the contents. If you don’t expect any more <h1> elements to be added, then sure, use h1 as the selector.
You may also have some kind of scenario like in this (contrived) example:
<div class="username">Justin</div>
<span class="username">Justin</span>
In this case, using .username will match both elements, since both have that class. You could use div.username or span.username to pin it down to the one you want to target.
Ok, so beyond those simple scenarios, when is this useful?
“Any fool can write code that a computer can understand. Good programmers write code that humans can understand.” — Martin Fowler
In most cases, the usefulness of adding this has less to do with the targeting process and more to do with conveying clarity to anyone looking at your selectors. For example, consider this selector: [name="level"]. Now, if there’s only one element with the name level on the page then this selector is perfectly adequate for targeting purposes. But, if I’m a new engineer looking at that selector, I don’t know whether it’s targeting an <input> field, a <select> box, a <textarea>, or something else entirely… Personally, I like the idea of seeing select[name="level"], not because it necessarily helps with targeting, but because it tells me something useful about the element (and probably the action being performed).
You could make a case that this makes the selector slightly more fragile… Perhaps an <input> field that you’re targeting gets changed to a <textarea> in an application update, so the selector breaks because you’ve used input[name="address"] and now it needs to be updated to textarea[name="address"]. That’s a fair argument… so I’d say to use your own judgment and preferences here. I like to include the tag when I feel like it conveys something useful to people working with the test. In my case, that’s typically <input>, <textarea>, <select>, <button>, <a> and occasionally a few others depending on the situation, like <li>.
Targeting using hierarchy
Hierarchy allows you to match based on nesting. A space indicates a descendant selector, meaning the element is found somewhere inside the parent element.
When you want just the immediate child, you can use a child selector with >.
There’s also the adjacent sibling selector + which matches an element that comes right after another at the same level.
Hierarchy in your CSS selectors should be used with caution because it immediately increases the complexity. With that said, using hierarchy is necessary in many situations — and can actually improve clarity in a few.

Here’s a simple DOM illustrating hierarchy where we’ve got <label> elements that are nested inside of (children of) <div> elements:
<div class="name">
  <label>Justin</label>
</div>
<div class="email">
  <label>test@email.com</label>
</div>
Let’s assume we want to target the <label> that contains “Justin”. How do we do that? We can’t use just label as our selector because that will match both <label> elements. We need to narrow down the parent element first. That selector would look like this:
.name label
I match the parent element using its .name class. I add a space afterwards. This indicates that I’m going to target an element contained within the element matched by the first string. After the space, I match the inner element. In this case, I’m just using the label tag name. This selector essentially says, “Find the <label> element somewhere inside of an element with a .name class.”
I can define as many levels of hierarchy as I’d like in a CSS selector using multiple spaces. In a large DOM, I may end up with something like this:
#supportForm .comments textarea
In that selector I’m looking for a <textarea> element, which is inside of an element with a .comments class, which is then inside of an element with an ID set to #supportForm. Of course, if the <textarea> element had a unique id or name attribute, I could make this much simpler… but that’s not always going to be the case.
In addition to using a space between child elements, I can also use an angle bracket like this: .comments > textarea. When I use the angle bracket, it means that the element is a “direct child” of the parent element. In other words, it’s in precisely the next “level” of nested elements — not just anywhere inside. Let’s illustrate this with another (contrived) DOM:
<div class="comments">
  <textarea></textarea>
</div>
<div class="comments">
  <div class="something">
    <textarea></textarea>
  </div>
</div>
If I use the selector .comments textarea, it will match both <textarea> elements. However, if I use .comments > textarea, it will only match only the first, since the second block has a <div> nested in between the two which breaks the “direct child” relationship.
The angle bracket can be useful for precision, but can also make selectors more and more brittle because you’re effectively taking away the flexibility of the selector. Adding an extra <div> layer (as in the example above) is a common occurrence, so you’re more prone to breakage when application updates occur. When hierarchy is a must, I’d avoid using the angle bracket unless you really need to (which shouldn’t be often). Sticking to spacing and broader relationships will help to keep your selectors more durable as your application’s DOM changes.
Targeting using ordering
In some case (most often in lists) it can be useful to target elements based on their position in a sequence. Here’s a simple DOM illustration:
<ul class="fruits">
  <li>Apple</li>
  <li>Orange</li>
  <li>Pear</li>
</ul>
I want to target the “Orange” entry. How do I do that? The <li> elements don’t have any distinguishing attributes… Fortunately, CSS provides an :nth-of-type() feature to target elements by their position in a list. For this example, my selector would look like this:
.fruits li:nth-of-type(2)
I simply plug 2 into the :nth-of-type() function since I’m looking for the second <li> element in the list. Simple, right? Positional patterns like :nth-of-type() are a pseudo class selector. They’re powerful and handy for lists or repeating elements, but they also raise css specificity and can become fragile if the order changes. For example, if “Orange” were moved to third in the list, this selector would no longer target it correctly.
Targeting using text contents
If you look at the DOM example in the section above, wouldn’t it be nice and semantic if we could target that <li> element using its “Orange” text? That would be nice, wouldn’t it?… I wish I could tell you that CSS has a tool for that, but unfortunately, standard CSS does not. You may have seen something like this before:
li:contains("Orange")
In principle, I love that selector. It’s clear to humans and it won’t break if the order of the list elements changes — semantic and durable. Unfortunately, the :contains() pseudo-class is something that’s only available in the Sizzle selector engine (popularized by jQuery). It’s not available in your browser by default right now. Very sad, I know… Early versions of Selenium injected the Sizzle engine for you, so you could use this feature in your tests. However, with Selenium v2 and up that is no longer done. At Ghost Inspector, we’ve built this into our system — but it’s only available in some of our browser options, not all.
The best solution I can offer right now is to consider mixing in XPath selectors which support matching by text contents. XPath is a method for element selection that has a different syntax than CSS, but is used in the same way. It deserves its own blog post in the future. In the meantime, the XPath selector for the example above would look like this:
//li[contains(text(), "Orange")]
XPath is supported by both Selenium and by Ghost Inspector, so this is a good option when matching an element by its text contents makes sense — which is fairly often. For more details on using XPath, check out our CSS to XPath Conversion Guide.
And if you’d like to refer back to any of these tips, save our CSS Selector Cheat Sheet infographic below.
Advanced CSS Selectors for Automated Testing
Once you’re comfortable with the basics, it’s worth exploring more advanced CSS selectors that can make your automated tests more flexible and powerful. These selectors allow you to target elements more precisely and handle complex scenarios.
Pseudo-class selectors
Pseudo-classes help you select elements based on state or position. Here are a few common ones that work well in test automation:
-
:first-child– Selects the first child of a parent. -
:last-child– Selects the last child of a parent. -
:nth-child(n)– Selects the nth child of a parent. For example,li:nth-child(3)targets the third list item. -
:not(selector)– Excludes elements that match a given selector.
Example:
ul li:not(.active)
This will target list items that do not have the active class.
Attribute selectors
Attribute selectors allow you to find elements by their attributes or parts of those attributes. These are especially useful in test automation when elements have data attributes.
-
[data-test="login-button"]– Targets an element with an exact attribute match. -
[href^="https"]– Selects elements where the attribute begins with a specific value. -
[href$=".pdf"]– Selects elements where the attribute ends with a specific value. -
[href*="download"]– Selects elements where the attribute contains a specific substring.
Common Mistakes When Writing CSS Selectors
When selectors break, automated tests often become unreliable. Here are a few mistakes that can make your selectors brittle and harder to maintain.
Overly specific selectors
Relying on long, detailed selectors tied to the DOM hierarchy (for example div.container > ul > li > a) makes your test fragile. If the page structure changes, your selector will likely break. Keep your selectors short and descriptive.
Depending on generated class names
Frameworks sometimes create dynamic class names like button-abc123. These are unstable and can change without warning. Instead, request that your development team add consistent id or data-test attributes to critical elements.
Selecting based on style or order only
Targeting elements based on their visual order (such as the “third button on the page”) leads to unreliable tests. It’s better to use semantic attributes or unique IDs whenever possible.
CSS Selector Cheat Sheet FAQS
How do I know when to use the different methods?
Welp, that’s a tough one. The most obvious answer is “experience”. As you work with HTML, CSS and the DOM more often (and in different situations), you’ll start to get a handle on what might work for different scenarios. But experience takes time, so let me offer some other advice.
I’ve designed this post to (sort of) walk through selector options from most ideal (simple and durable) to least. There are exceptions to this logic, but I usually take this approach when building a selector:
- Is there an
idattribute? Use that. - Is there a
nameattribute? Use that. - Is there some other unique attribute that I can use, like
placeholder? Use that. - Can I use attribute operators to match a portion and uniquely identify this element, like a link’s
href? Use that. - At this point I’ll start looking at class names to see if anything looks usable.
- If there’s nothing specific enough, I’ll take what I have so far (which may be a useful attribute or class that just isn’t specific enough or may be just the element tag) and I’ll start stepping out and looking at the hierarchy outside of the element. The same logic applies when targeting parent elements, so this logic is recursive. Just keep in mind that you don’t need to use the “direct” parent. You could jump back a few levels to a parent element that has an
idattribute or makes more sense semantically.
Another hugely helpful asset in deciding how to build these CSS selectors for your tests is your own knowledge of the application that you’re testing. What do you know about the way the DOM is designed AND what do you know about the way it may change in the future? Are portions of the UI more active than others? What’s likely to change? Are class names changed frequently? How does the engineering team think about the DOM? Ask them! Try to get a handle on how they go about changing the DOM and factor that into your own considerations.
What’s the difference between simple, group, and complex selectors?
A simple selector is the most basic way to target a page element, like an id selector (#login), a class selector (.btn-submit), or a type selector (input). These are easy to read and usually the most durable.
A group selector (sometimes called a grouping selector) lets you apply the same rule to multiple selectors at once. For example, h1, h2, h3 would target all headings. This is useful for styling, but can also help in automated tests when you want to check several related elements together.
A complex selector combines multiple conditions, like hierarchy or attributes, to pinpoint a specific html element. For example, #signupForm input[name="email"] matches the email input only inside the signup form. Complex selectors are powerful, but they increase css specificity and can be more fragile if the page layout changes.
When building automated tests, the general rule is to start with simple selectors, use grouping only when it makes sense, and reserve complex selectors for situations where nothing else works.
Should I modify my application to make targeting easier in my tests?
This is a tricky question that I get asked quite a bit. Believe it or not, you can always match an element on the page uniquely with a CSS selector. However, that selector may end up being super ugly and brittle with no better alternatives available.
If you find yourself in a situation where there’s no “good” selector available to locate an element, is it acceptable to have the engineering team add an id or some other attribute that you can use? This can be really handy. Obviously a unique id makes for an easy selector. I’ve also heard folks suggest the use of [data-testing="id-here"] or [qa="id-here"] type attributes specifically for targeting during testing.
I have mixed feelings about this approach. It can make your life much easier, but also comes with trade-offs… If you decide to go this route, make sure everyone understands those tradeoffs. Here are the two downsides that I see:
- By adding attributes to your application’s markup which exist for the sole purpose of testing, in some ways, you’re adding another level of “maintenance” outside of your test cases themselves.
- Adding attributes to your application’s markup increases its size. Unless you’re doing something really slick, this extra code is probably making it to production which means that you’re technically slowing down your live application.
What tools can I use to help me generate CSS selectors?
If you’re a Ghost Inspector user, we’ve got a test recorder for your browser that will generate CSS selectors for you as you record a test. However, those selectors are generated algorithmically and are meant to be reviewed afterwards. The recorder doesn’t know anything about your application or what’s dynamic, so they’re often going to be a bit more rigid than necessary. In some dynamic cases, they simply won’t work without modification. Chrome too has a built-in option for generating a CSS selector by clicking on the element in using its developer tools:
But again, without any human knowledge, these selectors can sometimes be a bit ugly. There’s really no substitute for your own skills and knowledge here. The one tool that’s probably most useful is simply your browser’s developer console, which allows you to query the DOM for your selectors using JavaScript, like this:
document.querySelectorAll('.my-selector')
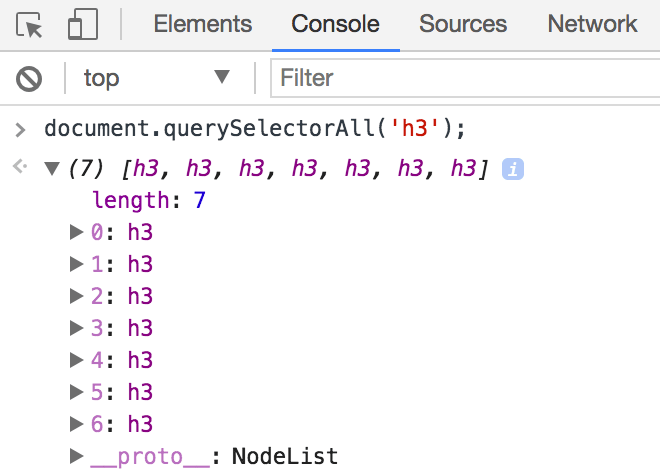
Get familiar with that line of code! It’s incredibly useful for figuring out exactly what your CSS selector will match on the page, both when building selectors and when troubleshooting them. You can also use document.querySelector() to match a single element, but I recommend using document.querySelectorAll() during your development process to help ensure that you’re only matching the element you expect, and not others (which will happen often).
Tips for troubleshooting
A couple of quick tips if you’re running into problems with a CSS selector:
- Have you used
document.querySelectorAll()to ensure that the selector is matching exactly (and only) what you intend on the page? - Are you targeting an attribute that’s dynamic and changing on each page load? For instance, like the dynamic IDs that we covered above.
- Is the element that you’re targeting inside of a
frameoriframe? Each frame has a completely separate DOM, so that complicates things. Unfortunately, that’s outside of the scope of this post, but if you’re using Ghost Inspector, see our documentation on frames. - Could your problem actually be timing related? Are you searching for an element before the element has been created? This is common in JavaScript-heavy applications. Ghost Inspector automatically waits for elements to appear in the DOM before proceeding with each step which remedies this, but if you’re writing your own Selenium tests, you may need to add a “Wait” command.