


Creating a Test
Once the extension is installed, you will notice a Ghost Inspector icon appears in your extensions toolbar.
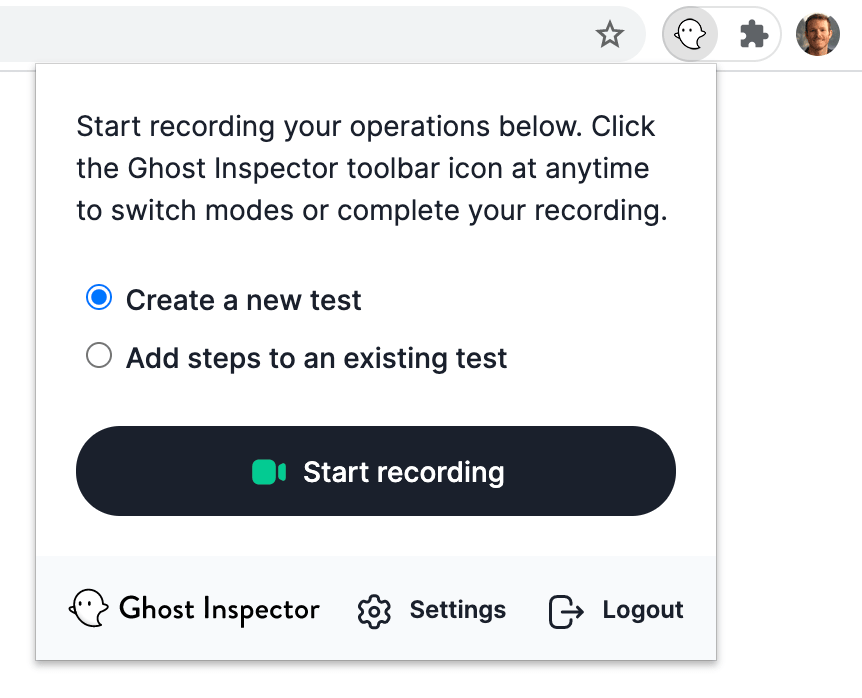
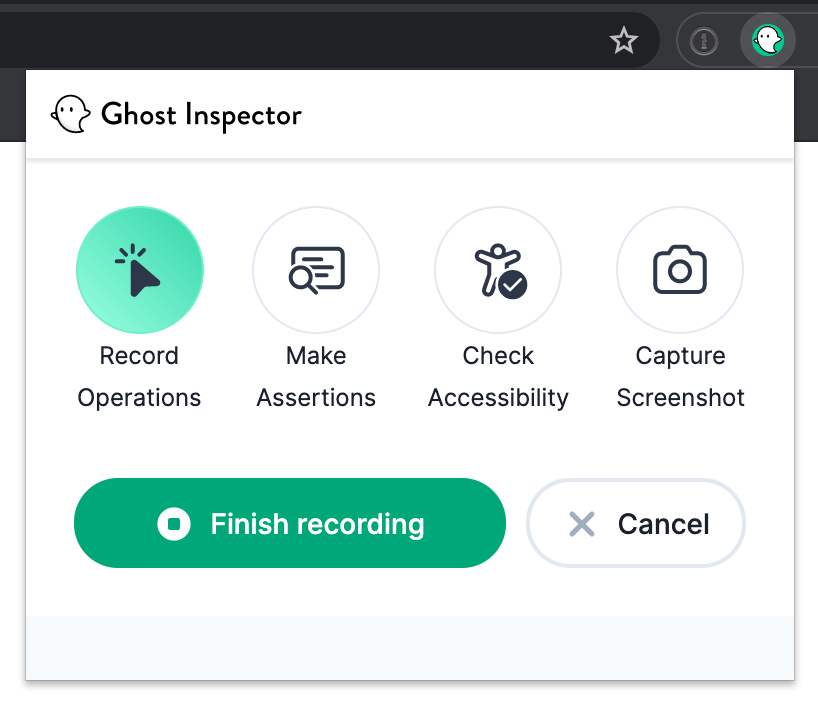
The extension operates by capturing the actions you perform in your browser, such as clicking on elements and filling out forms. These actions are then transformed into a test that can be later executed through Ghost Inspector. When you click the Start Recording button, the extension will begin recording your actions. At any point during your test, you can switch from the Record option to any of the following:
- Make assertions – An assertion allows you to confirm that certain conditions are met on the page, like clicking an add to cart button. We recommend making at least one assertion per test, but you can make as many as you’d like.
- Check accessibility – This allows you to run an accessibility check to ensure anyone with disabilities can access your website.
- Capture screenshots – This feature is useful to ensure that the elements of your website look the same across different browsers, mobile resolutions, or screen sizes. You can capture a screenshot at any point during a test.
Once you have completed recording your actions and assertions, your test will be synced with Ghost Inspector. It can be executed manually, on a scheduled basis, or via our API. During test execution, it simulates the actions of a human user in a web browser, just as you performed them during the recording process. Ghost Inspector can promptly notify you with detailed information if your test fails or if there is a significant change in the resulting screenshot.
Using the Check Email Feature
In some cases, you may need to verify that an email was sent during your test. This can be particularly important if your website or web app relies on email functionality, such as sending confirmation emails or password reset links.
Fortunately, Ghost Inspector has a ‘Check Email’ feature that enables you to easily confirm whether an email was sent during your test. Here’s how it works:
- Fill out the email capture field/form including an email formatted like this: username@email.ghostinspector.com. You can use whatever you’d like for the username, but keep in mind, you will need it for the next step as well.

- Once you’ve filled out the email form and submitted it during your test, visit email.ghostinspector.com/username, inserting whatever you chose for the username at the end of the URL.
- This URL will take you to the testing inbox we’ve created for you, where you can verify that your email form is working and the content is correct.

Analyzing your Test Results
Once you’ve recorded and saved your test, it will launch an instance of Chrome, with a default screen size and geolocation – all of which are customizable in the test settings (more on those in a bit!).
The test we execute replicates the actions you recorded. It involves opening the specified web app or site, conducting necessary assertions, and generating a result. This result includes detailed information about each step’s outcome, captures a final screenshot, and records a video of the entire process.
At the top of the test results page, you’ll see some basic information for the latest completed test, such as pass/fail status, the date and time the test was completed, how long it took us to run the test, the browser environment, and the geolocation.
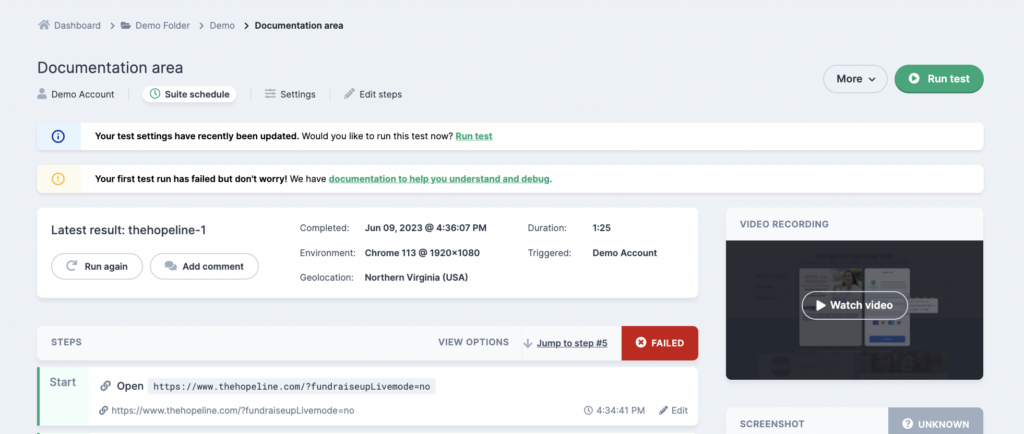
Below that, you’ll see all of the details of your test steps with a pass/fail status for each. Then, there will be your Test Run History to show you the past 6 months of test runs. Historic test runs are also available for download as a CSV file.
Screenshot Comparison
Our Screenshot Comparison feature happens on the last step of the test. The first time your test runs, you will capture what is called a “baseline” screenshot, the image in which Ghost Inspector uses to compare all future screenshots. In future test runs, you will then see a side by side comparison of the baseline image and the image captured in that test run, and Ghost Inspector will let you know if there are any discrepancies. If you have expected changes to your page, you can set a tolerance level so your test doesn’t fail every time we notice a discrepancy. For further customization, you can also exclude or target specific elements in your screenshot.

Enhancing your Tests
As previously mentioned, there are a number of ways to customize your tests to ensure they meet your requirements. Outlined below are some of the ways you might consider configuring your tests.
Test Settings
Once you’ve recorded a test, you can easily edit your test steps, add new ones, set your test schedule and more. Let’s take a brief look at some of the settings you can adjust to customize things to fit your needs.
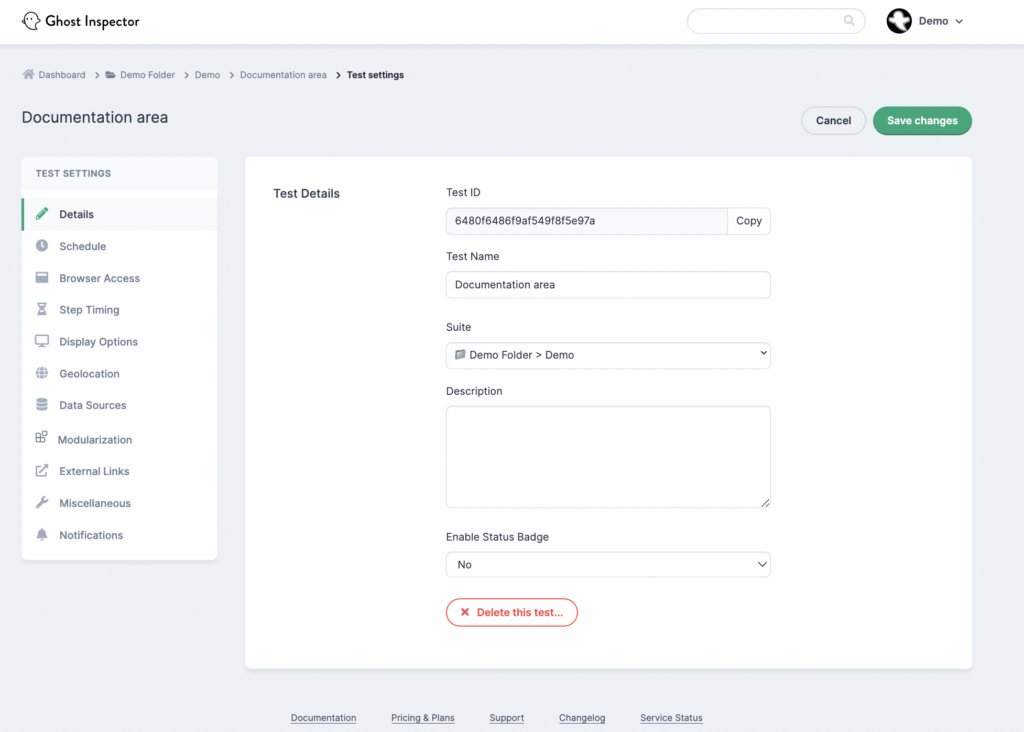
- Test Schedule – Configure when and how frequently your tests should run, ensuring they align with your desired testing cadence.
- Browser Access – Specify the browsers on which you want to execute your tests, ensuring comprehensive coverage across different browser environments.
- Browser Versions – Select specific browser versions to target during testing, allowing you to ensure compatibility with different browser releases.
- Step Timing – Here you can adjust the timing delays between various situations in the test.
- Display Options – In this section you can make changes to the display size and setting for the test, including options related to the Screenshot Comparison feature.
- Geolocation – Simulate different geolocations during testing to verify location-specific functionalities or localize your web application.
- Data Sources – Data Sources allow you to perform data-driven testing. When a Data Source is assigned, an individual test run will be executed for each row of data whenever the test is triggered.
- Modularization – Leverage modularization to break down tests into smaller, reusable components, enhancing test maintenance and reusability.
- External Links – Ghost Inspector offers the ability to associate external links with your tests. For example: link a failing test to a Jira issue or a Zendesk support ticket. Anything with a permanent URL can be added in the test settings and will be displayed on the test, for all users.
- Notifications – Test notifications can be set at the organization, suite and test levels. They are inherited and can be overridden at each level. Options set here will be applied to this test only. You can use suite settings to apply them to the whole suite, or organization settings to apply them to your entire account. Various notification options are available including email, webhooks and more.
- Combining Multiple Browsers, Screen Sizes, and Geolocations – Utilize Ghost Inspector’s capabilities to combine multiple browsers, screen sizes, and geolocations within a single test run, allowing you to comprehensively test across various scenarios.
By leveraging these test settings, you can tailor your automated tests to suit your specific needs, ensuring thorough testing coverage, accurate results, and efficient testing processes. For detailed instructions and further information on each aspect of Test Settings, refer to the complete documentation Test Settings Documentation.
Test Variables
We offer a range of built-in variables that can be used for making unique values and creating filler details in your tests, such as emails addresses, states, cities, titles, first name/last name, lorem ipsum text, etc. For example, you might want to create a new email address each time you test your website’s signup form.
Learn all about variables here.
FAQs
Can tests be scheduled to run at specific times?
Absolutely! Ghost Inspector provides scheduling capabilities, allowing you to set up automated test runs at specific times or intervals. This feature is particularly useful for regular regression testing, ensuring that your web applications remain functional and bug-free.
Can Ghost Inspector integrate with other tools and platforms?
Yes, Ghost Inspector offers seamless integration with various tools and platforms, enabling you to incorporate it into your existing workflow. It supports integrations with popular tools like Slack, Jira, and more, allowing you to automate test execution and streamline collaboration within your team.
Is Ghost Inspector suitable for non-technical users?
Certainly! While Ghost Inspector provides advanced features for technical users, it also caters to non-technical users. Its intuitive interface, browser extension recording, and visual test editing capabilities make it accessible to users with varying levels of technical expertise.
Can I run tests on different browsers and devices using Ghost Inspector?
Absolutely! Ghost Inspector supports cross-browser and cross-device testing. You can execute your tests on Chrome and Firefox.
Does Ghost Inspector support parallel test execution?
Yes, Ghost Inspector offers parallel test execution, allowing you to run multiple tests simultaneously. This significantly reduces test execution time and improves efficiency, enabling you to obtain results faster.
What level of support is available for Ghost Inspector users?
Ghost Inspector offers excellent support to its users. You can access comprehensive documentation, tutorials, and guides on their website. Additionally, they provide responsive email support to address any queries or issues you may encounter.
Can I try Ghost Inspector before making a commitment?
Absolutely! Ghost Inspector offers a free trial, allowing you to explore its features and determine if it meets your testing requirements. Take advantage of this trial period to evaluate Ghost Inspector and see firsthand how it can benefit your testing process.
Additional Resources
We’ve gone over the basics in this post, but if you’re wondering if Ghost Inspector can handle more complex test cases – the answer is likely a yes! Here are some additional resources to help you learn how to get the most out of our platform, and if you have any questions about how Ghost Inspector might work for your use case, please let us know!
- Getting Started Documentation, which walks you through an example test scenario
- Guides on more advanced features
- More FAQs
- Schedule a demo