

Visual Studio Team Services is a one-stop-shop for managing source code, custom packages, agile workflow, and continuous integration. Having recently released our VSTS extension for Ghost Inspector I thought it would be a fun idea to test and deploy an app with a Microsoft toolchain, namely Visual Studio Team Services, Microsoft Azure, and Ghost Inspector using our new extension.
Getting started
We are going to need a few things before we get started, so we may as well do that now:
- If you haven’t already, set up an account with Ghost Inspector.
- We will need an account with Microsoft. We will be able to use this to set up both VSTS and Azure.
- Set up a subscription with Azure. We will get a \$250 credit right out of the gate which we can use to run our app for now.
Our node app
Before we get into any of the infrastructure configuration, let’s take a quick look at our sample application. If you don’t have an existing application you can use our demo app on GitHub to get you started.
The HTML under test
The HTML structure of this app is pretty basic, and will be easy to test against:
<!DOCTYPE html>
<html>
  <head>
    <title>Express</title>
    <link rel="stylesheet" href="/stylesheets/style.css" />
  </head>

  <body>
    <h1>Express</h1>
    <p>Welcome to Express</p>
  </body>
</html>
This output is just the main view from a basic boilerplate Express app created with the Express generator, however, in order to run this as a Web App on Azure, we are going to need to modify a few things.
Boilerplate modifications
First, double-check your package.json has version 2.0.3 of pug or newer, earlier versions don’t seem to install well on Windows.
My package.json looks like this:
{
  "name": "azure-demo-app",
  "version": "0.0.1",
  "private": true,
  "scripts": {
    "start": "node serve.js"
  },
  "engines": {
    "node": "8.x"
  },
  "dependencies": {
    "body-parser": "~1.13.2",
    "cookie-parser": "~1.3.5",
    "debug": "~2.2.0",
    "express": "~4.13.1",
    "morgan": "~1.6.1",
    "pug": "2.0.3",
    "serve-favicon": "~2.3.0"
  }
}
Next, we’re going to need to move one of the files in our boilerplate application. Typically we would serve our application from ./bin/www, however the bin namespace is reserved in Azure and we won’t be able to access it for our webserver, so I’ve actually copied the file to serve.js and placed it in the root of my project.
I’ve also made one code change for it to work from the new location, I’ve changed line 7 from this:
var app = require('../app')
to this:
var app = require('./app')
This change just makes sure our relocated serve.js can find our app.js which is the heart of our application.
Azure Node.js configuration
Last, we are going to need a specific file to tell Azure how to run our application. We need to place a new XML file in the root of our project called web.config that will look like this:
<configuration>
  <system.webServer>
        <handlers>
          <!-- indicates that the file is a node.js application to be handled by the
            iisnode module -->
          <add name="iisnode" path="serve.js" verb="*" modules="iisnode"/>
        </handlers>
        <rewrite>
          <rules>

            <!-- First we consider whether the incoming URL matches a physical file in
              the /public folder -->
            <rule name="StaticContent">
              <action type="Rewrite" url="public{REQUEST_URI}"/>
            </rule>

            <!-- All other URLs are mapped to the Node.js application entry point -->
            <rule name="DynamicContent">
              <conditions>
                <add input="{REQUEST_FILENAME}" matchType="IsFile" negate="True"/>
              </conditions>
              <action type="Rewrite" url="serve.js"/>
            </rule>

          </rules>
        </rewrite>
  </system.webServer>
</configuration>
This is going to instruct our Web Apps server (IIS) that we are a Node.js app and also instruct the server how it can find dynamic content like images and style sheets.
With those changes in place, we’re ready to take a look at our Ghost Inspector test suite.
Our test suite
Back in my Ghost Inspector account I’ve created a new test suite called Test Azure demo app and then created a single test called Test my app. The test consists of 2 steps:
- Test that the
h1element contains the text “Express”. - Test that the
pelement contains the text “Welcome to Express”.
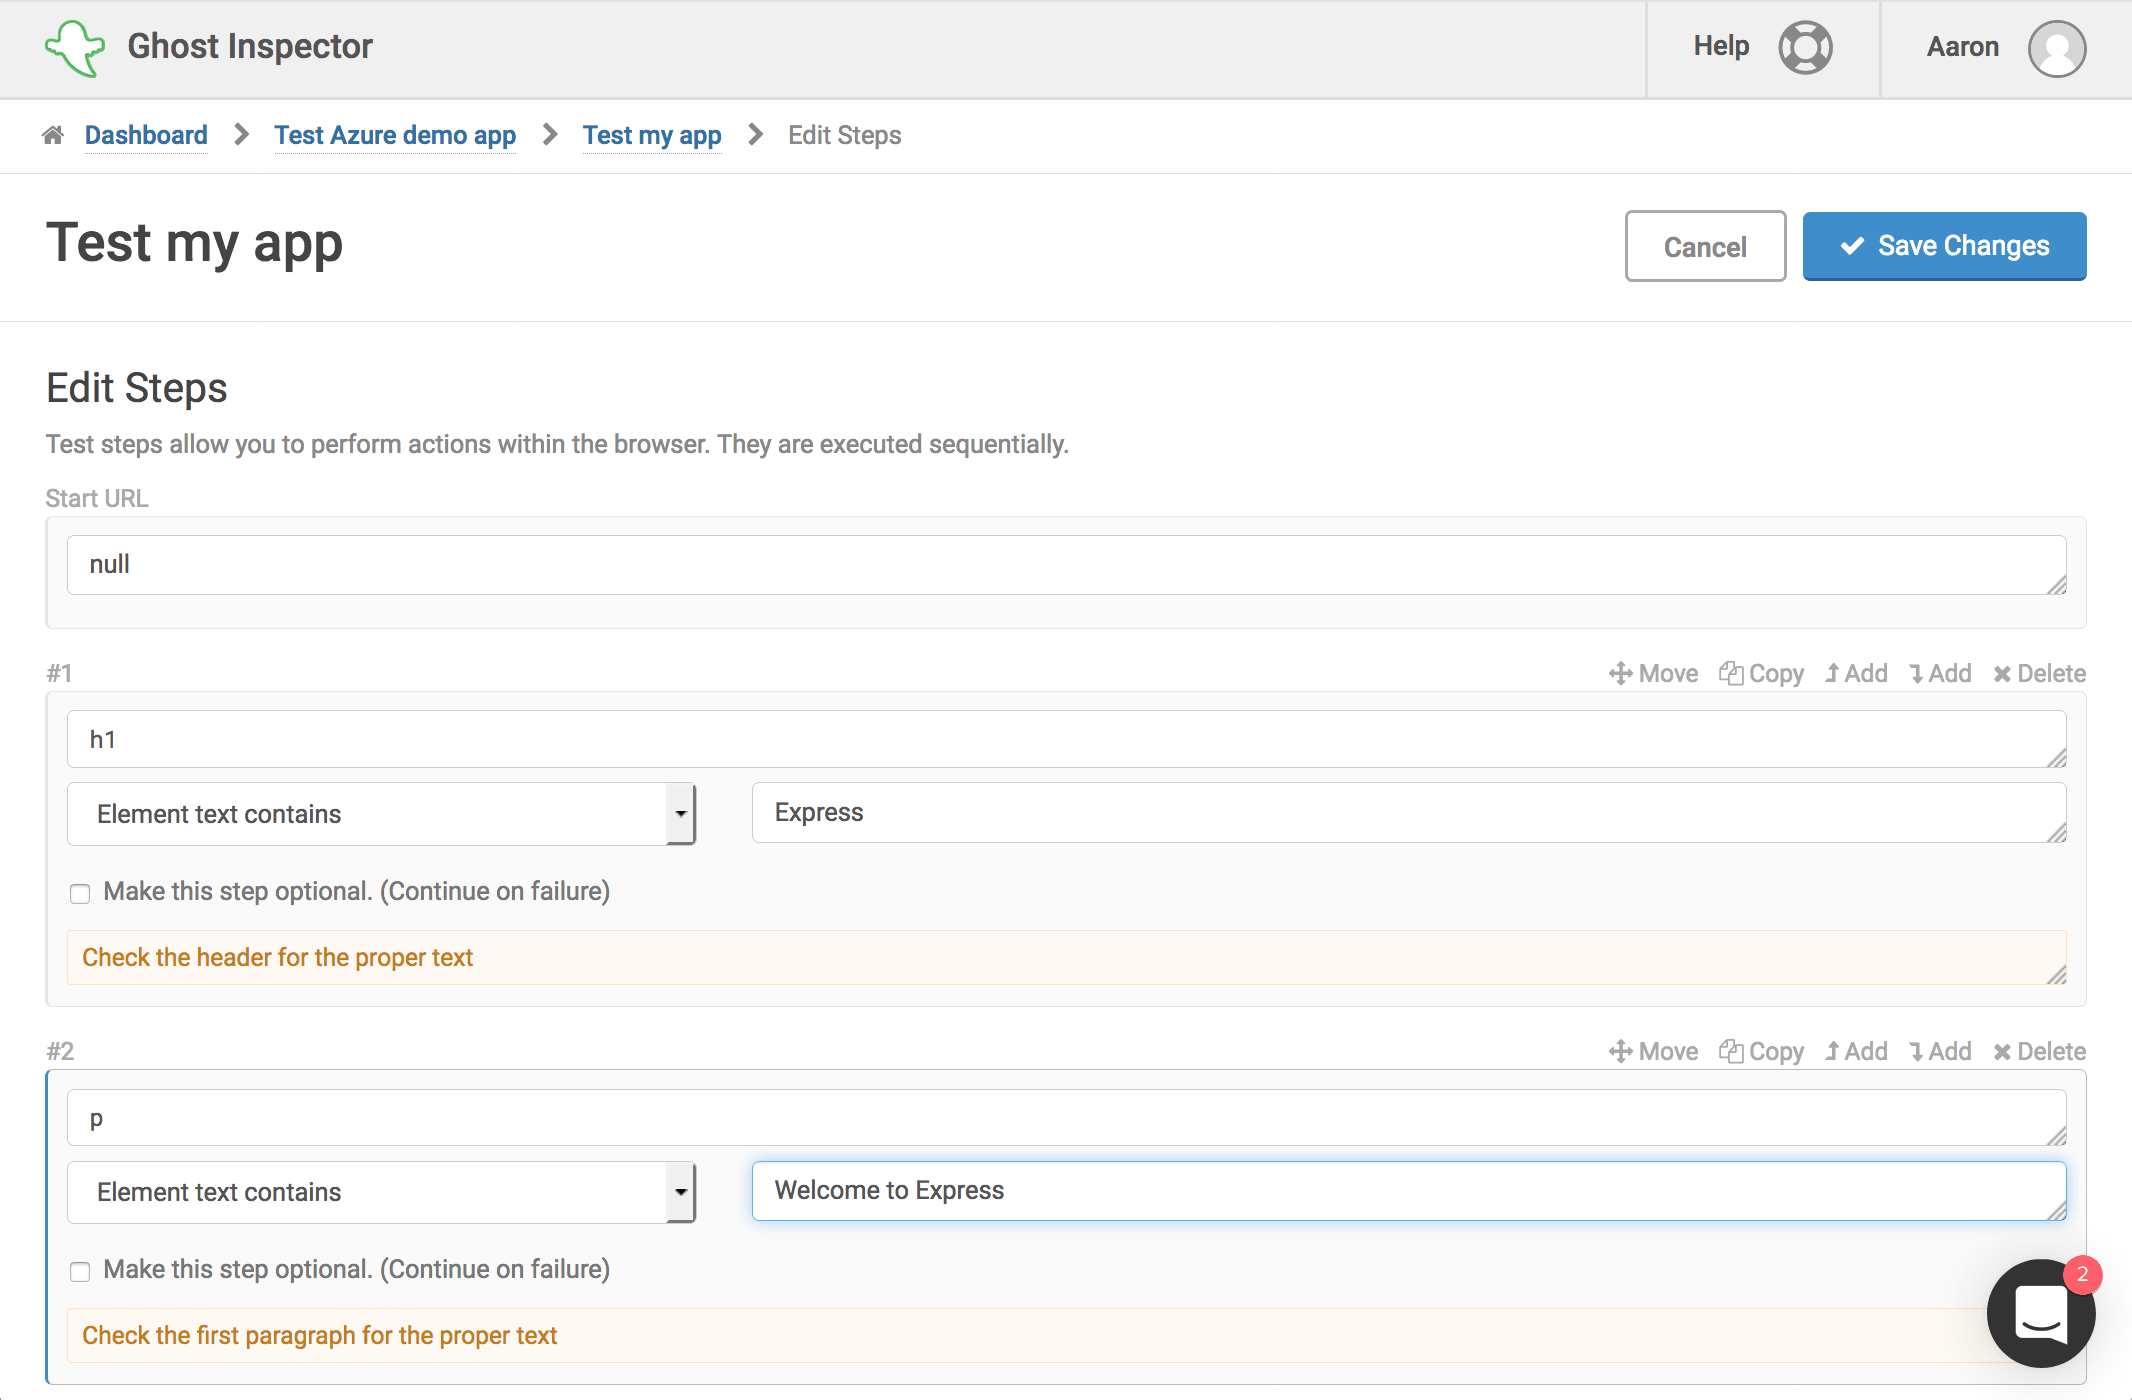
It’s pretty simple (and maybe a little contrived) but it should work for now. Let’s move on to some infrastructure.
Setting up Azure
Azure is a cloud platform from Microsoft, similar to Amazon Web Services or Rackspace Cloud. Platforms like this give us the ability to develop and deploy new resources in minutes with a few clicks of a button. In order to get started we will want to set up our first Web App resource
Web Apps
Web Apps are one of the quickest ways to get up and running in Azure; they give use all the boilerplate we need to start our application.
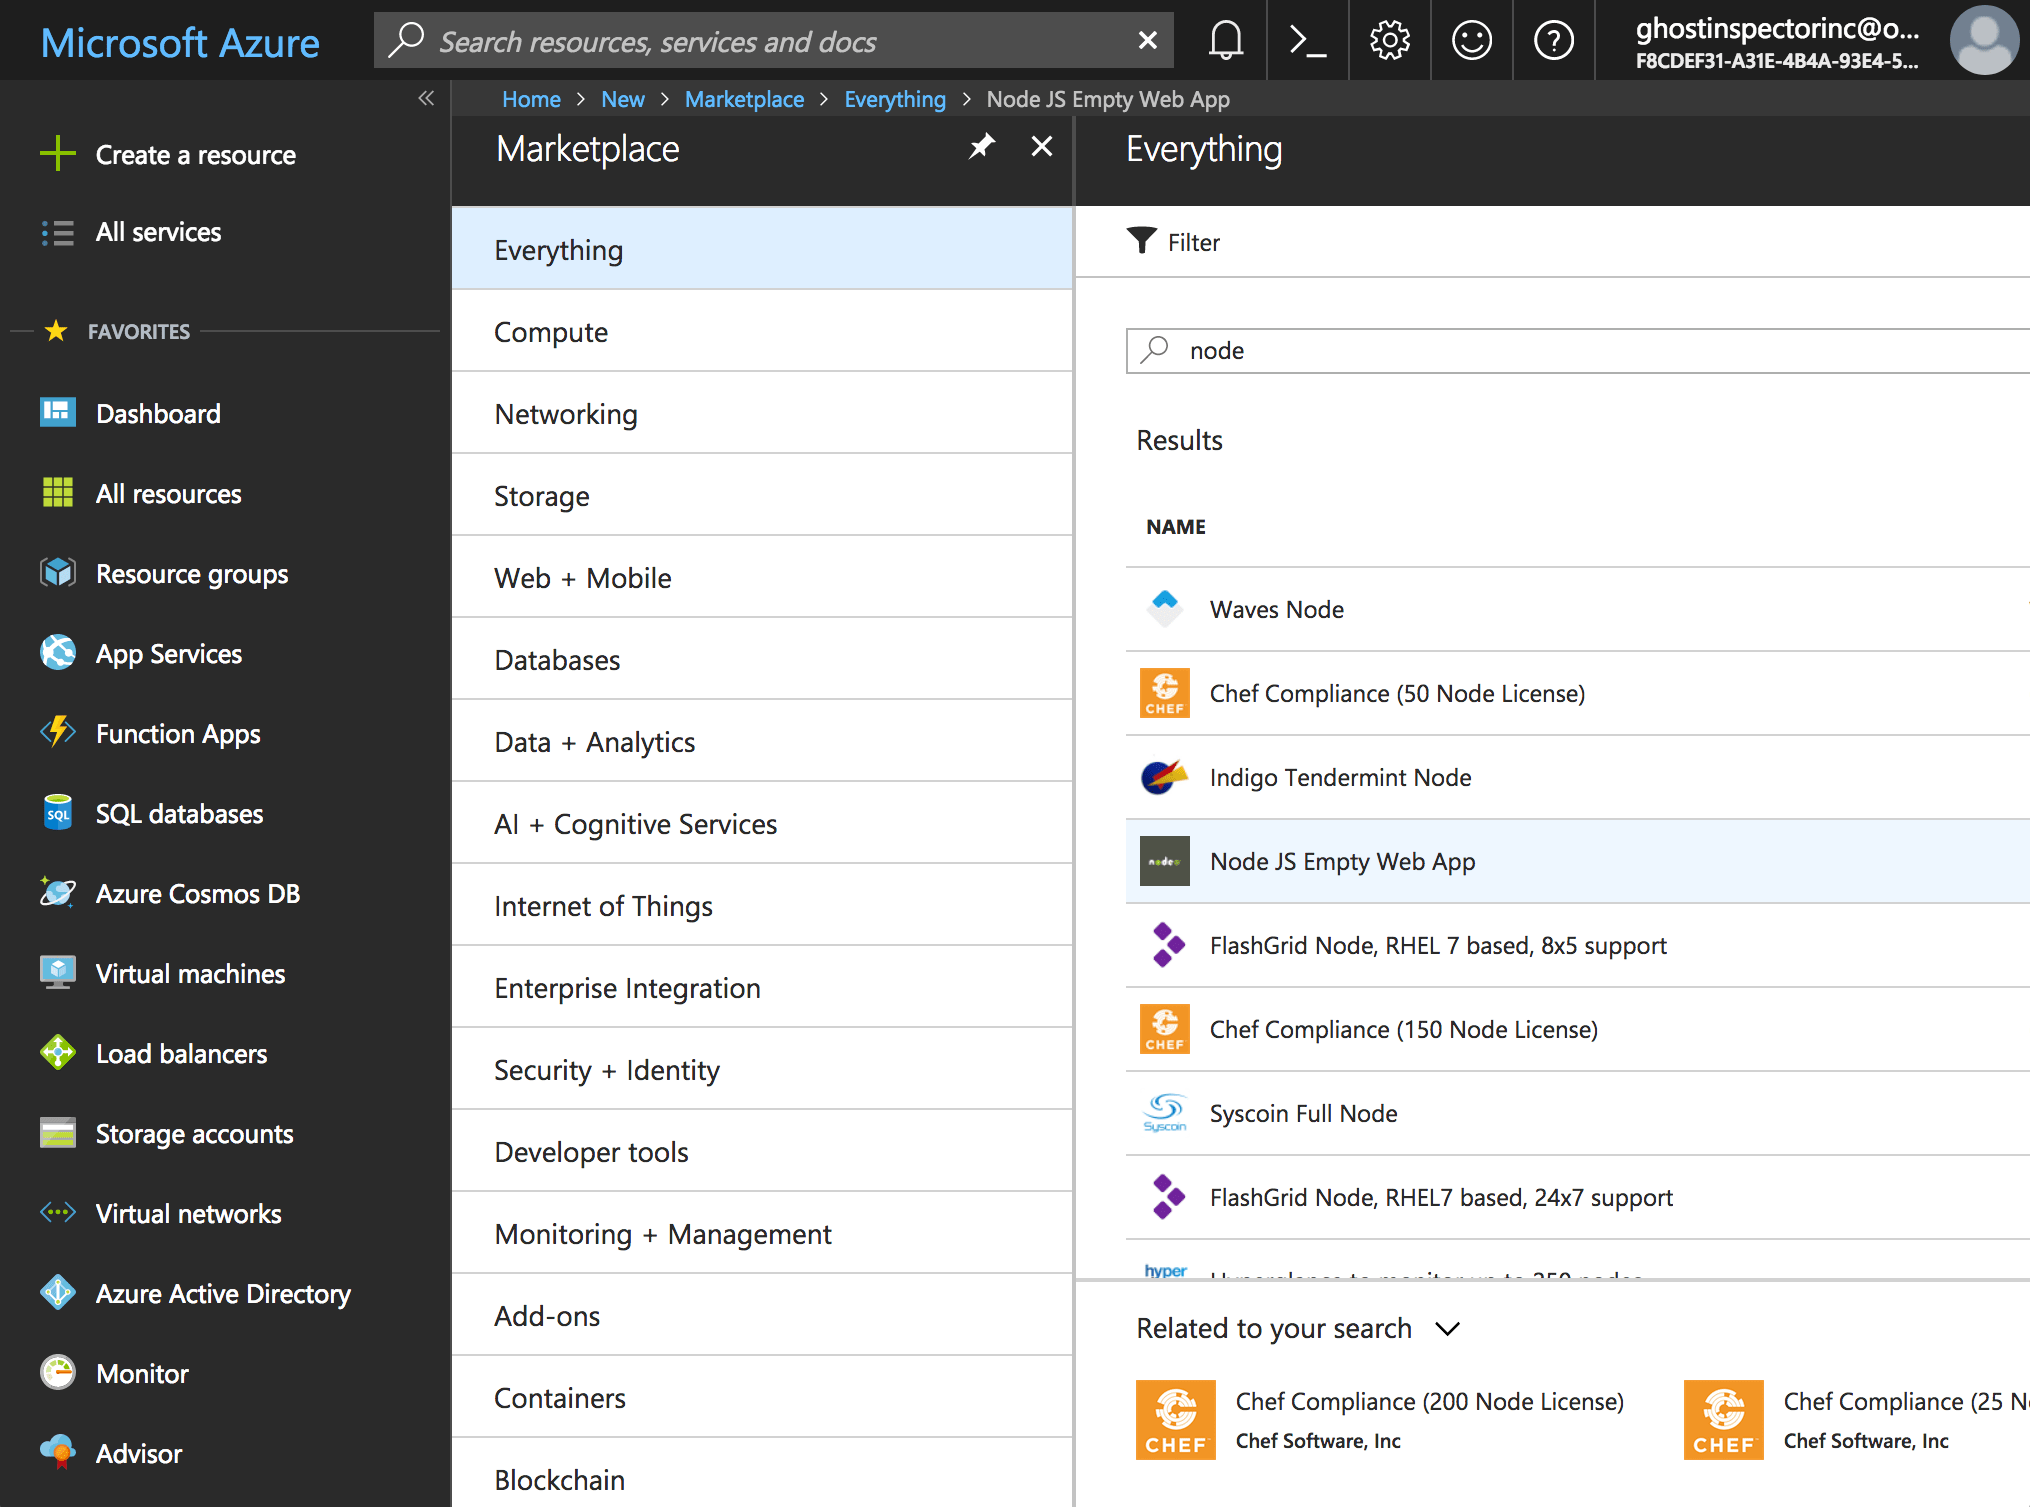
To provision our first Web App, click + Create a resource and then type “node” in the search box and hit Enter. If we scroll down the list a little bit we should see “Node JS Empty Web App”, select that option and hit Create.
Web Apps get a namespace on the azurewebsites.net so we will have to give our app a unique name, I’ll use “my-azure-demo-app”. I’ll select my subscription as well as my Resource Group. If you do not have a Resource Group already, go ahead and create one that is the same name as your app. Resource Groups are how costs are tracked in Azure, so if we delete the app down the road, we will delete the Resource Group as well to stop incurring charges. Since you’re probably on the Free Trial, it should be fine for now.
I’ll also select Pin to Dashboard so I get a handy shortcut to my new app. I’ll click Create and we can watch the progress as the new app is deployed.

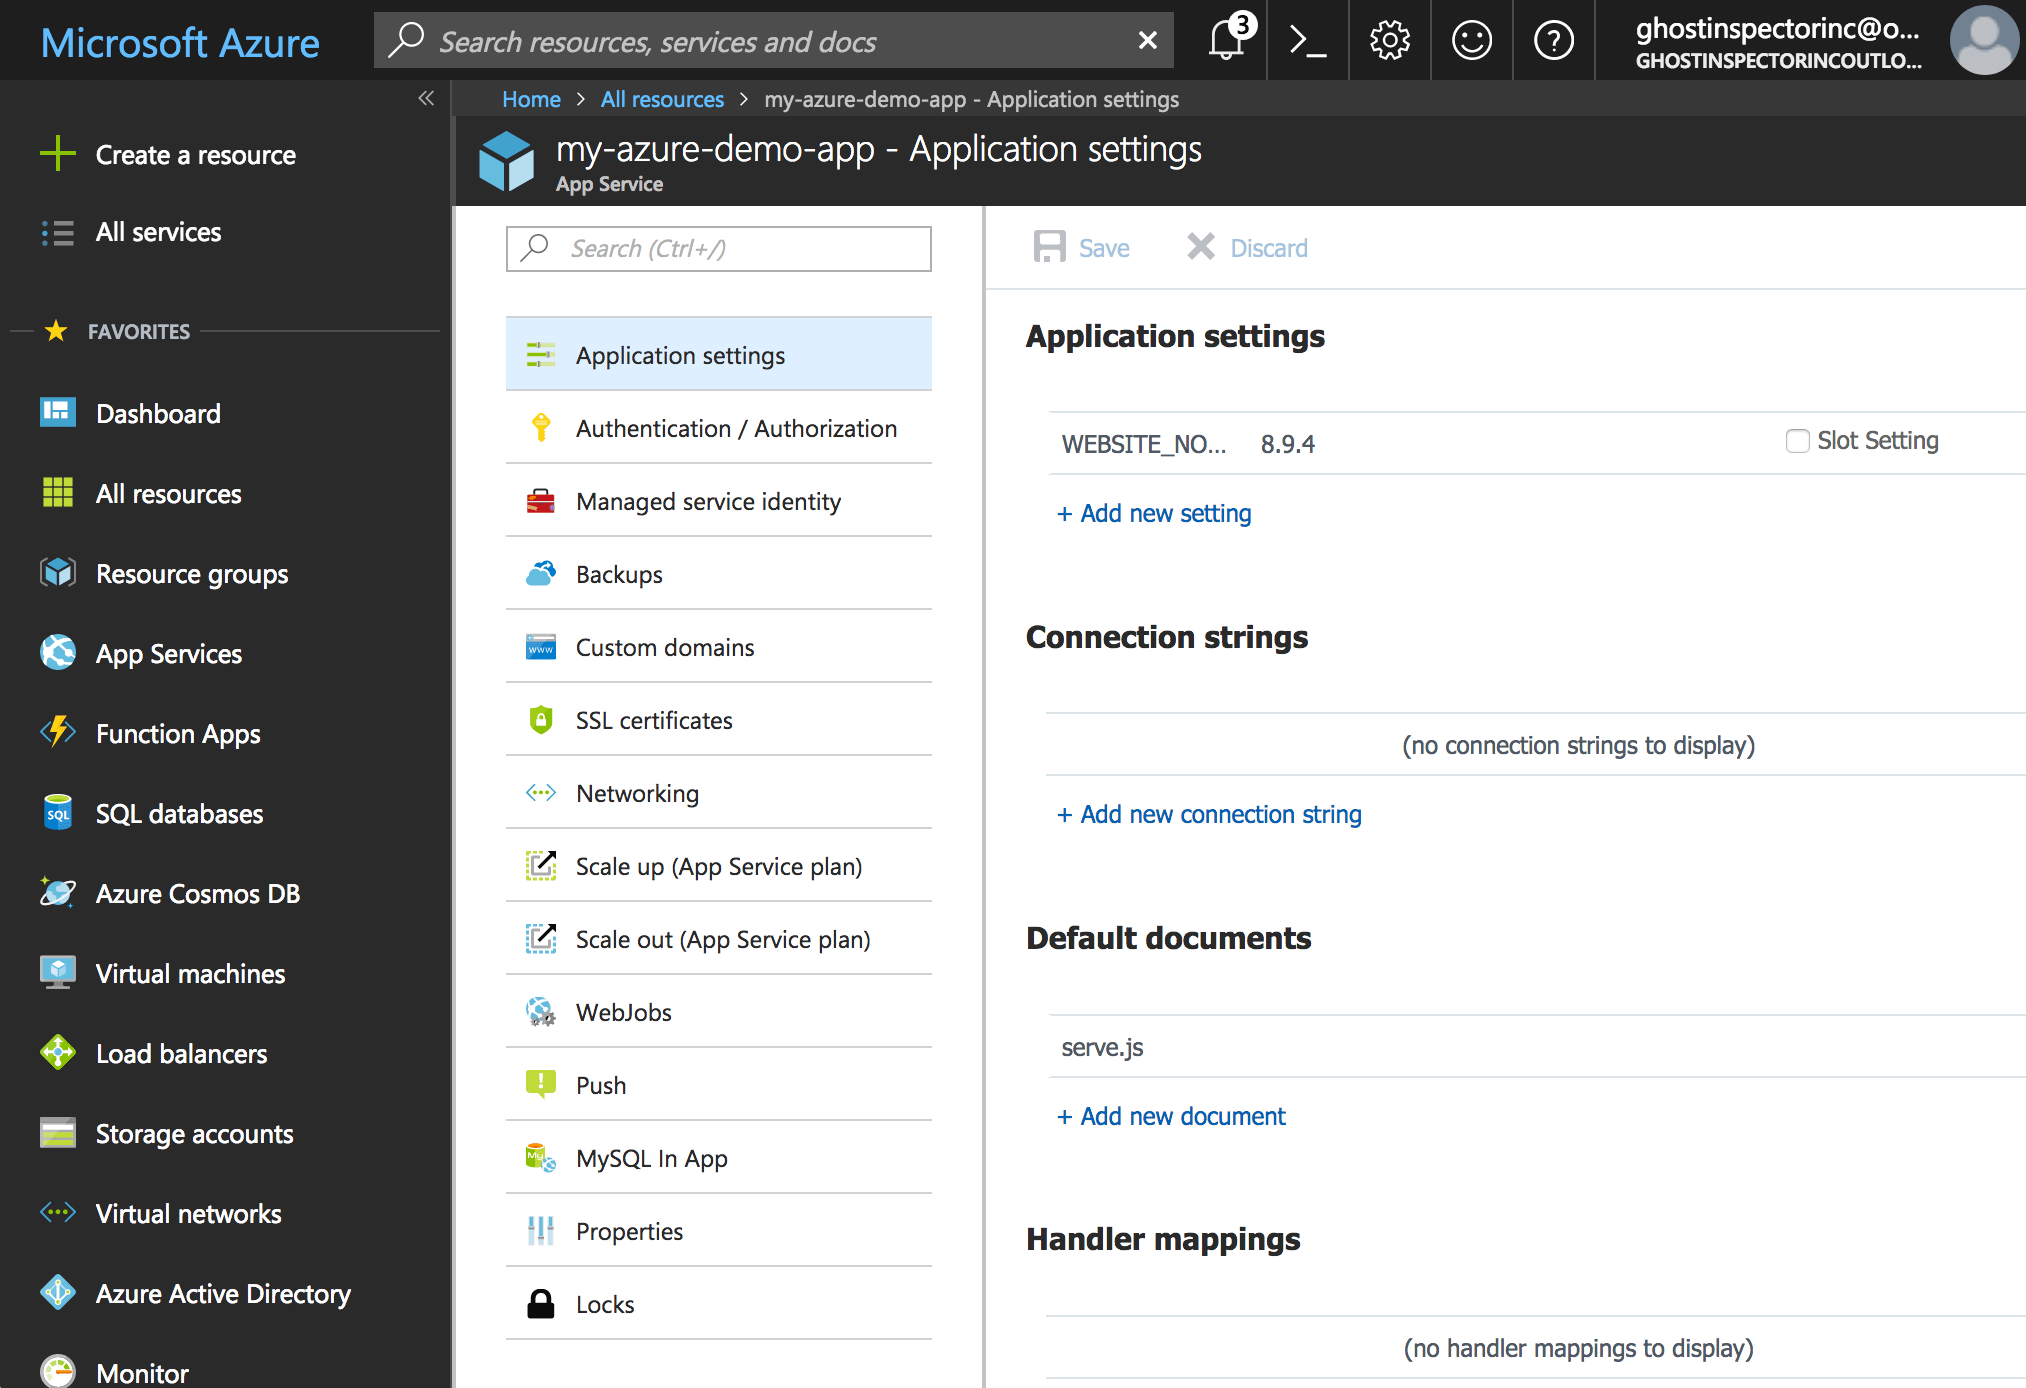
Before we move on to our CI configuration, we’ll need to tweak two more setting for our Application to run in Azure. Go to Application settings and modify the following:
- Application settings: we need to add an entry to tell Azure what version of Node.js we want to run, enter a key of
WEBSITE_NODE_DEFAULT_VERSIONand a value of8.9.4(currently LTS). - Default documents: remove all the extra entries and add a single entry of
serve.js, the entrypoint of our application.
Don’t forget to hit Save.
Visual Studio Team Services
If you haven’t already, let’s get your application source code committed and pushed up to your favorite repo provider and then we’ll tie into VSTS.
Our first project
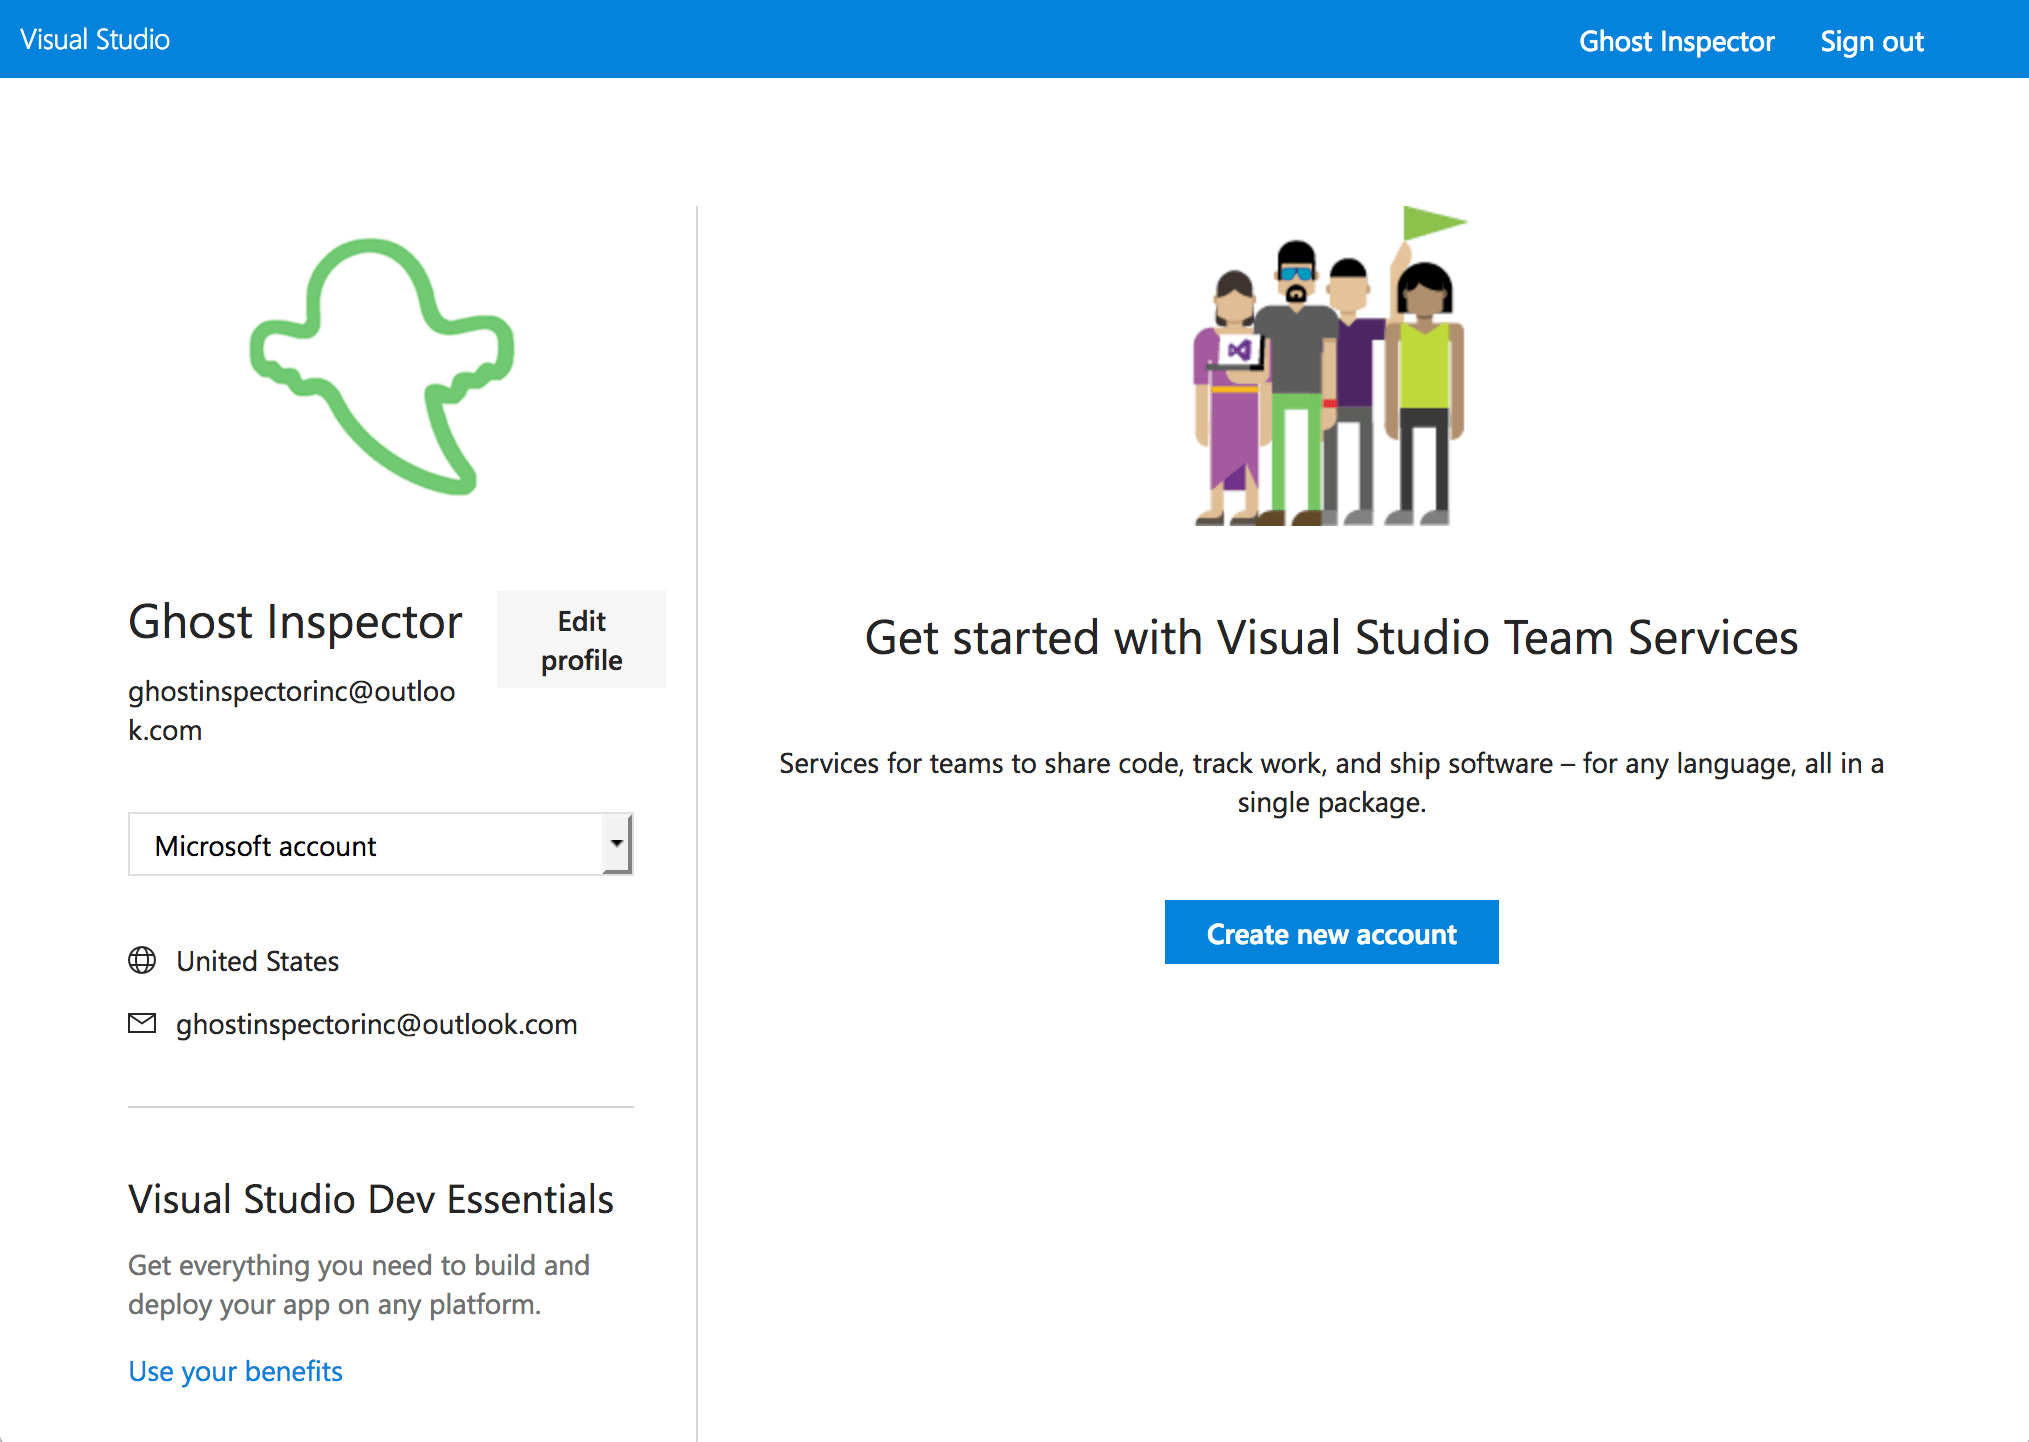
One of the nice features of having a Microsoft Account is that you can access the majority of their products using the same account. Head on over to the VSTS home page and sign in with your Microsoft account. We will be prompted to create a VSTS account as soon as we’re signed in.
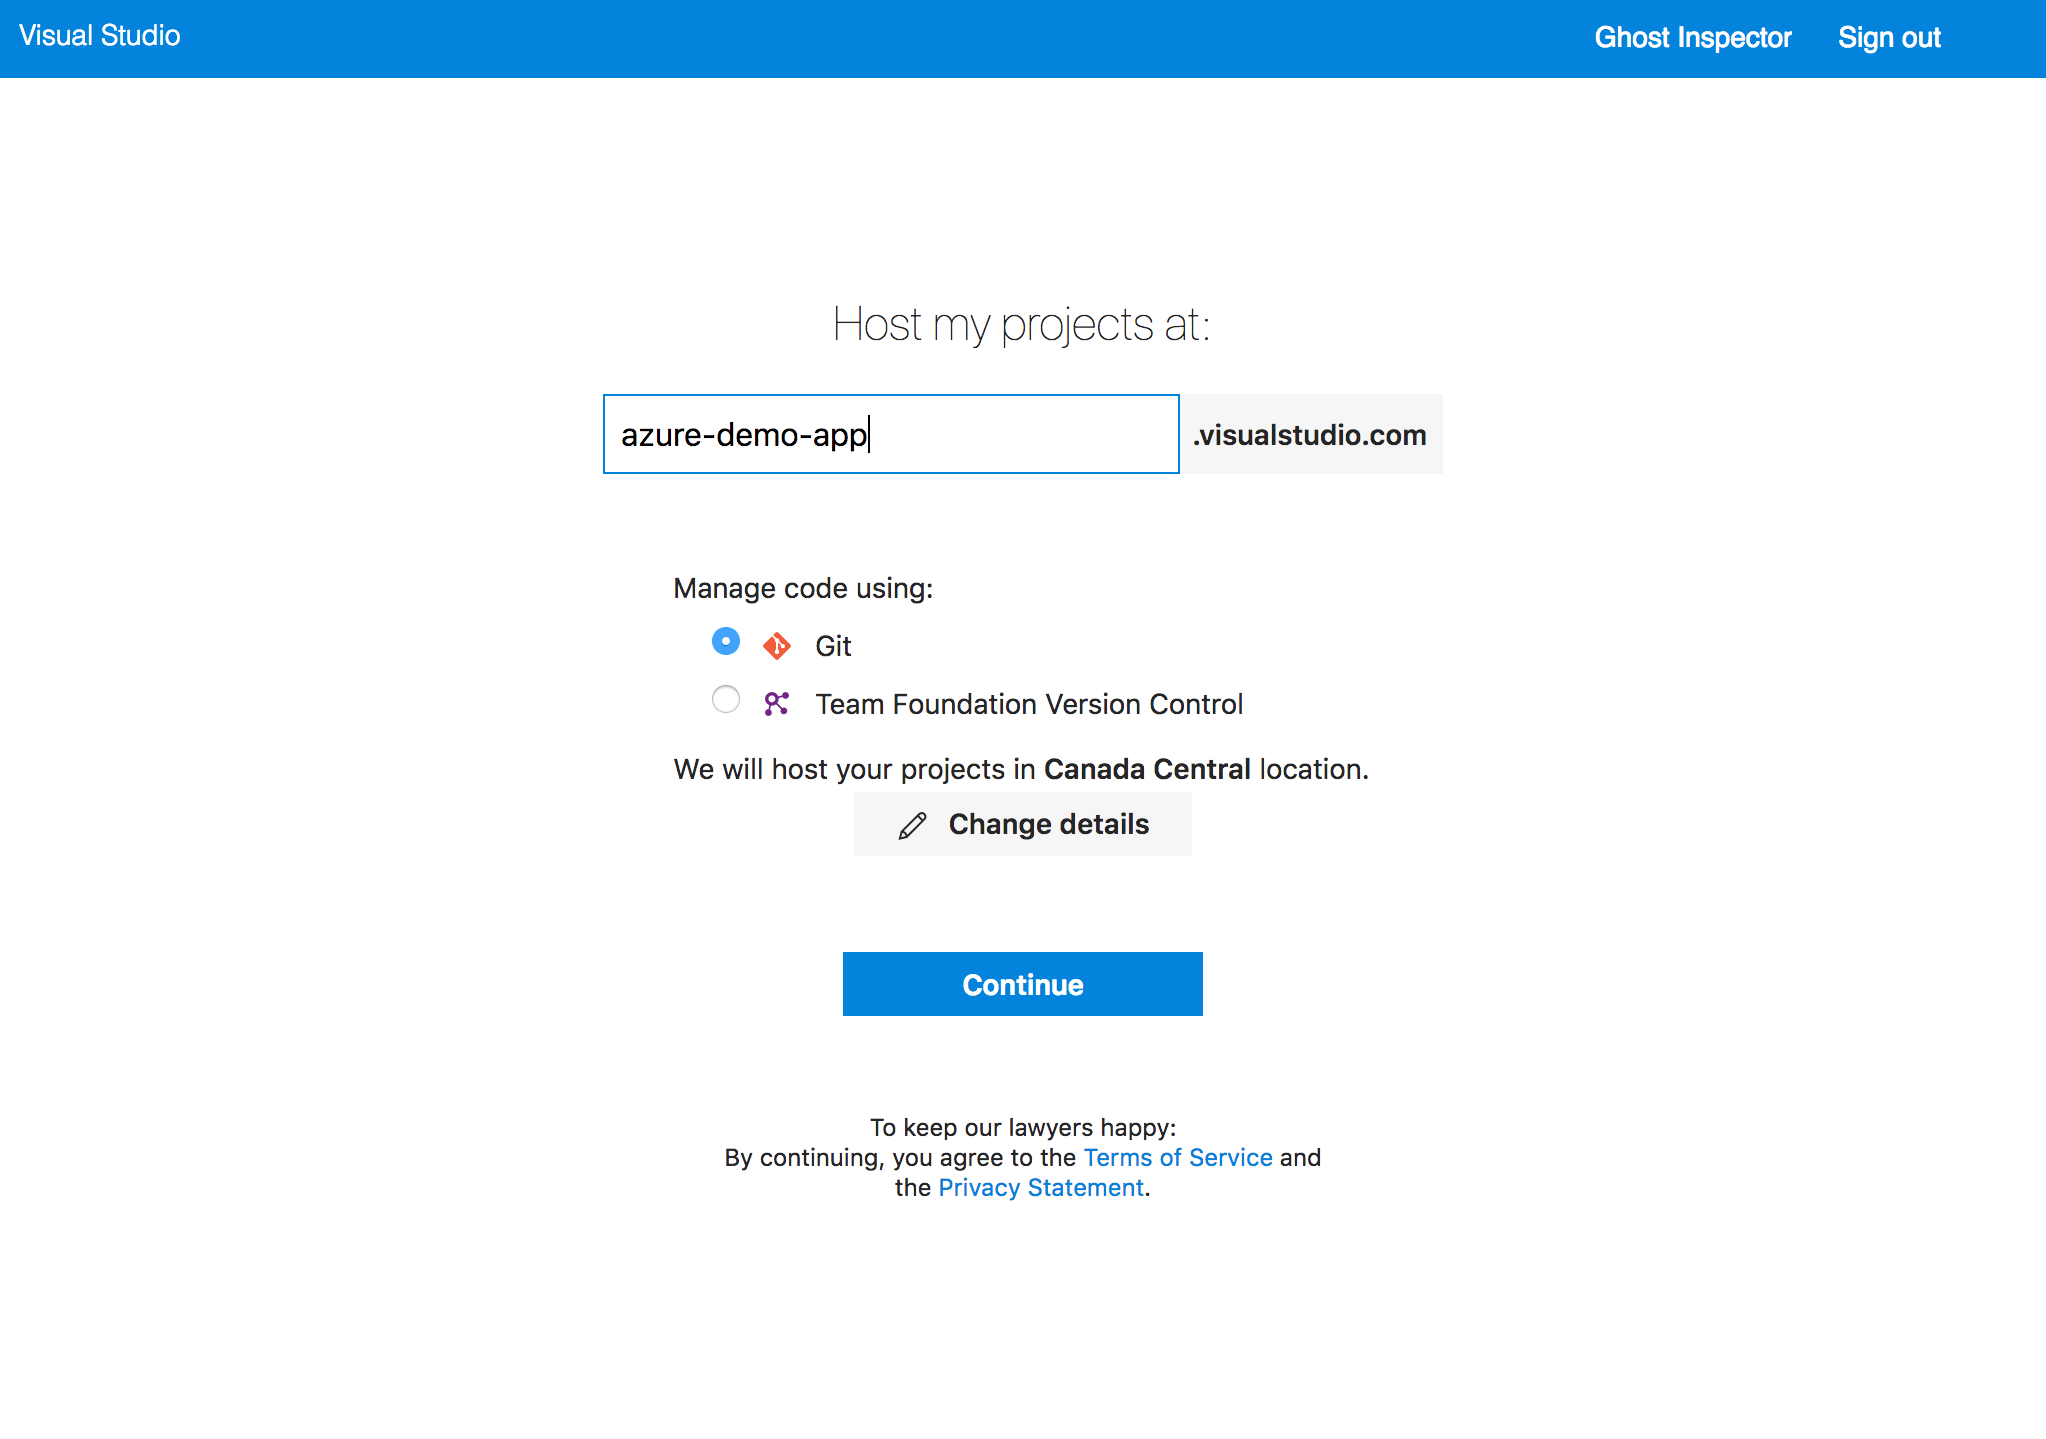
Next you’ll need to pick a unique name for our project (I’ll use azure-demo-app) and set Manage code using to git, assuming you’re using Github. If you wish, change the location where your projects will be hosted.
Setting up the build definition
With a brand new project, we need to set up our first Build Definition. This is basically the set of actions that will comprise our application’s build, test, and deploy steps.
To do that, go to Build and Release > Builds and click on + New definition. By default VSTS Git will be selected as our SCM provider, but I am going to select External Git since I am using Github. Next I’ll need to add Github as a Service in VSTS, so I’ll click Add Connection and paste in the URL of my repository. Because my repo is public I don’t need any credentials to access it, but if you are using a private repository, you will need to enter them now. Click Okay and then Continue. Next we’ll be asked to select a template for our build, however I will simple select Empty process to continue.
Adding build steps
With the build definition created, we now need to add some build steps. We can see at the top of our Task list a new task phase called Phase 1. Let’s click the + icon to bring up a list of available tasks.
Archive the application files
Before we can deploy to Azure, we need to zip up our app files. At the top of the process list we can see we already have a source code checkout step, so let’s bundle things up for deployment. In the search box on the right, let’s search for the Archive extension and add it.
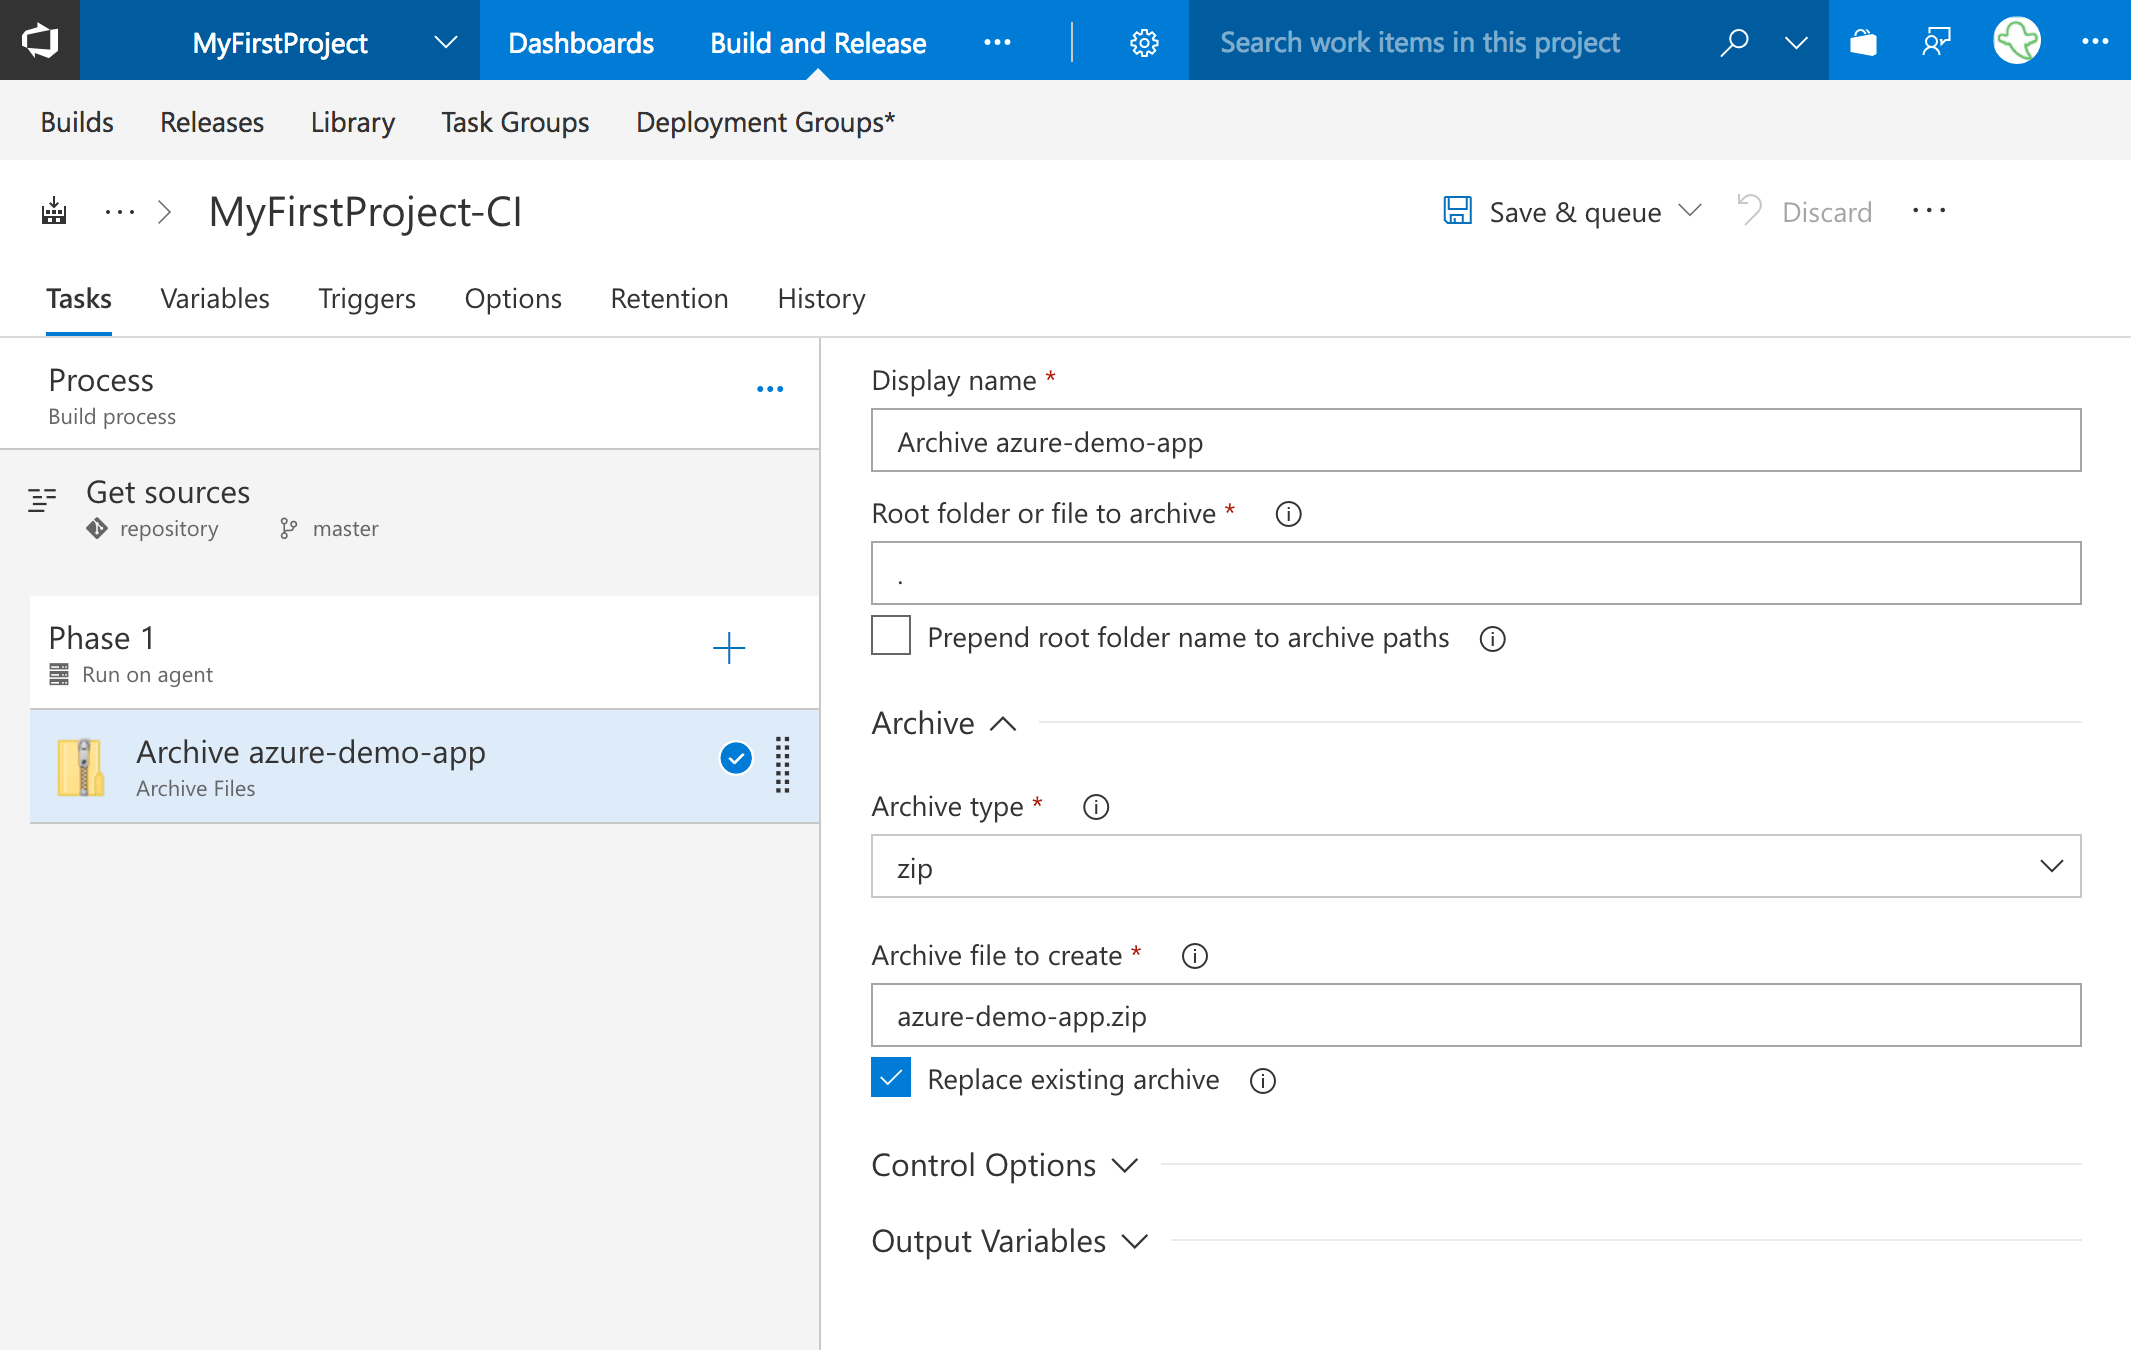
Let’s take a look at our options:
- Display name: Set this to whatever you wish the step to appear like in the task list on the left. I’ll use
Archive azure-demo-app. - Root folder or file to archive: This is what we are archiving. I want the entire application so I’m going to use
.. If your app was inside abuilddirectory or something like that you could change this value. I’m also going to uncheck “Prepend root folder name to archive paths”, I don’t want any additional folder structure in my archive. - Archive type: This should be
zip. - Archive file to create: This is the name of our zip file, I’m going to use
azure-demo-app.zip.
The rest of the options I will leave as is.
Deploy to Azure task
Now we can move on to our deploy step. Let’s click the + again on the left and type Azure App in the search. Next add the task Azure App Service Deploy.
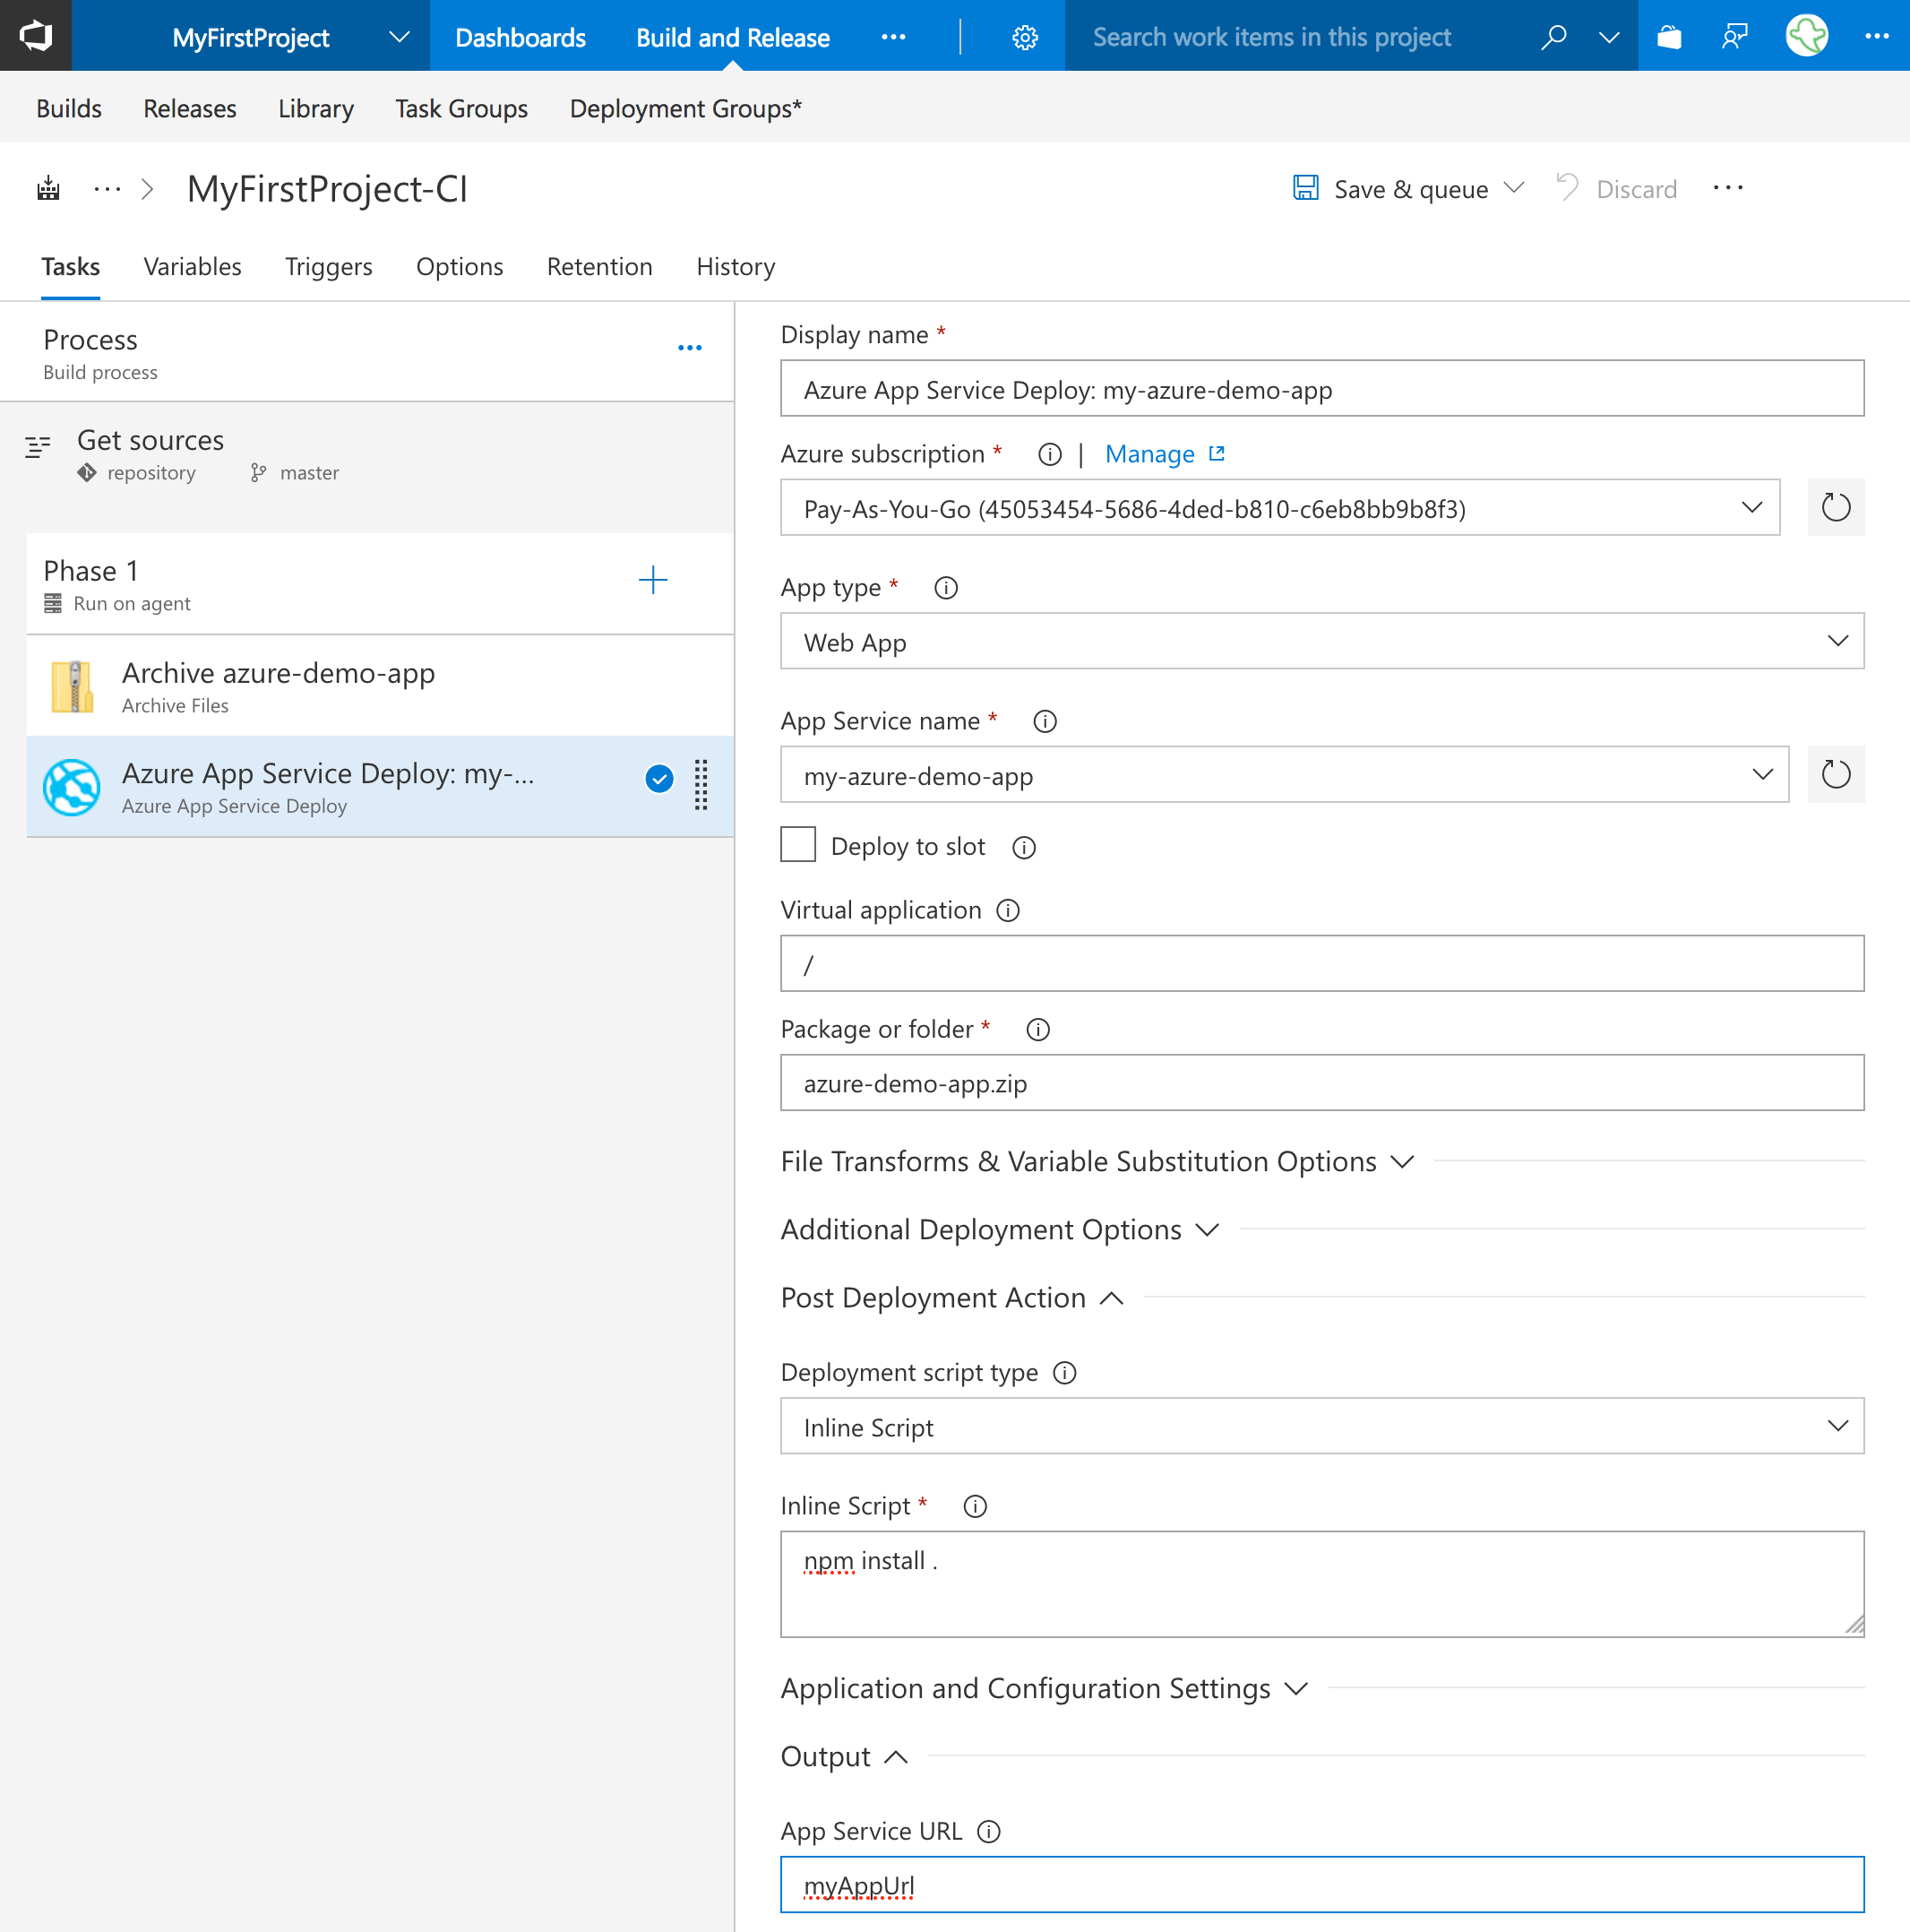
Here’s our configuration breakdown:
- Display name: Set this to whatever you wish the step to appear like in the task list on the left. I’ll use
Deploy azure-demo-app. - Azure subscription: If you are still logged into Azure you should be able to elect the subscription you set up earlier with Azure and then click Authorize. You will be walked through the process of connecting your Azure account.
- App type: Select
Web App. - App Service name: This is the App Registration that we set up when we were setting things up in Azure. Select your application from the dropdown, in my case it is
azure-demo-app. If you don’t see your app listed, you may need to hit the refresh button on the right. - Virtual application: Change this to
/to coincide with the root application in Azure. - Package or folder: change this to our zip file,
azure-demo-app.zip. - Virtual application: Change this to
/to coincide with the root application in Azure. - Post Deployment Action: Change this to
Inline Scriptand then change the script to:npm install .This will be executed on the Azure instance after the code has been transferred. - Output: The App Service Deploy extension has one single output variable which is the URL of the deployed application. Let’s put
myAppUrlin the App Service URL box, which we will use in just a minute.
I will leave the rest of the config alone and move on.
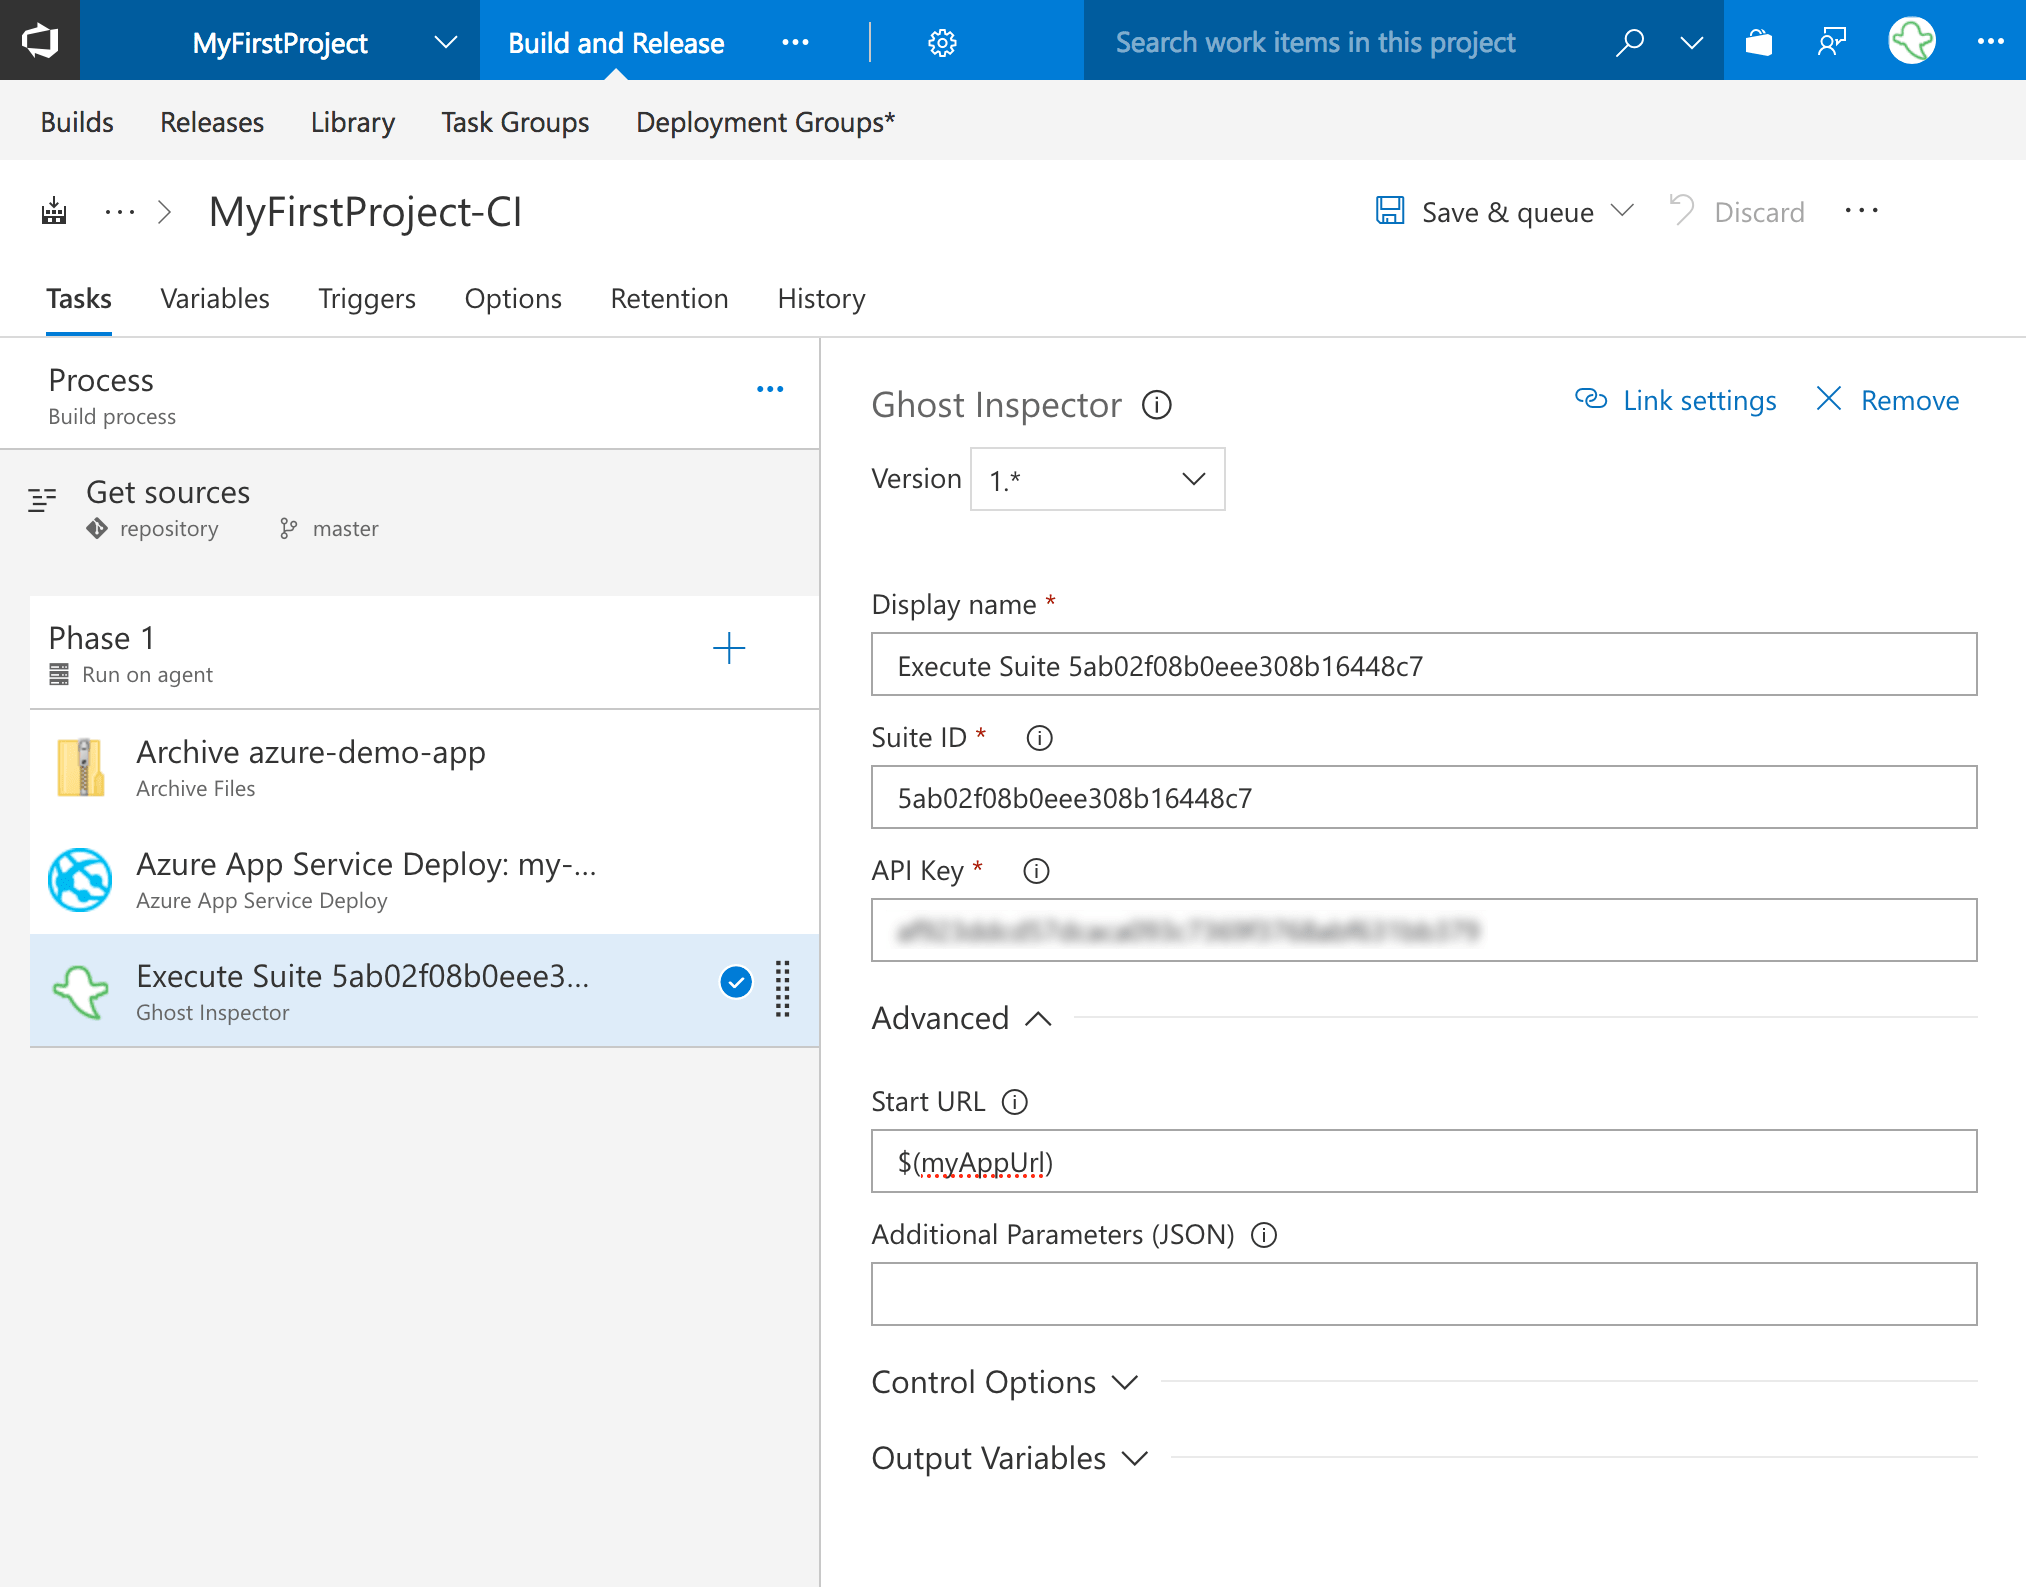
Ghost Inspector VSTS extension
We’re getting close! This is the last little bit of configuration we need before we run our build. Click the + on the left one more time to add another step. This time we will search for ghost. If you haven’t added it already, you’ll see our VSTS extension under Marketplace. Click on the Get it free button and walk through the process of installing it into your VSTS environment.
With our extension installed, we just need to add a bit of configuration:
- Display name: Again, change this to whatever you like.
- Suite ID: This is the Ghost Inspector test suite ID you’d like to run against your application.
- API Key: Your Ghost Inspector API key from your account.
- Advanced > Start URL: We will set this to the output of the last task,
$(myAppUrl), this will execute the suite with astartUrlof our deployed Azure app.
I don’t have any additional parameters to send off to my test, so I’m finished with this config.
With that we’ll click Save & queue, select Hosted and then Save & queue. We should see a green confirmation bar at the top with a link to our build job where we can view the logs. Let’s go there now.
The build output
Now our job is queued and should be picked up by the next free agent. If you clicked through to the build job output, we should see the output in the panel on the right. This is where we will receive any errors or messages that might be necessary for debugging our build. With any luck all the little checkboxes will turn green and we can go check out our new app!
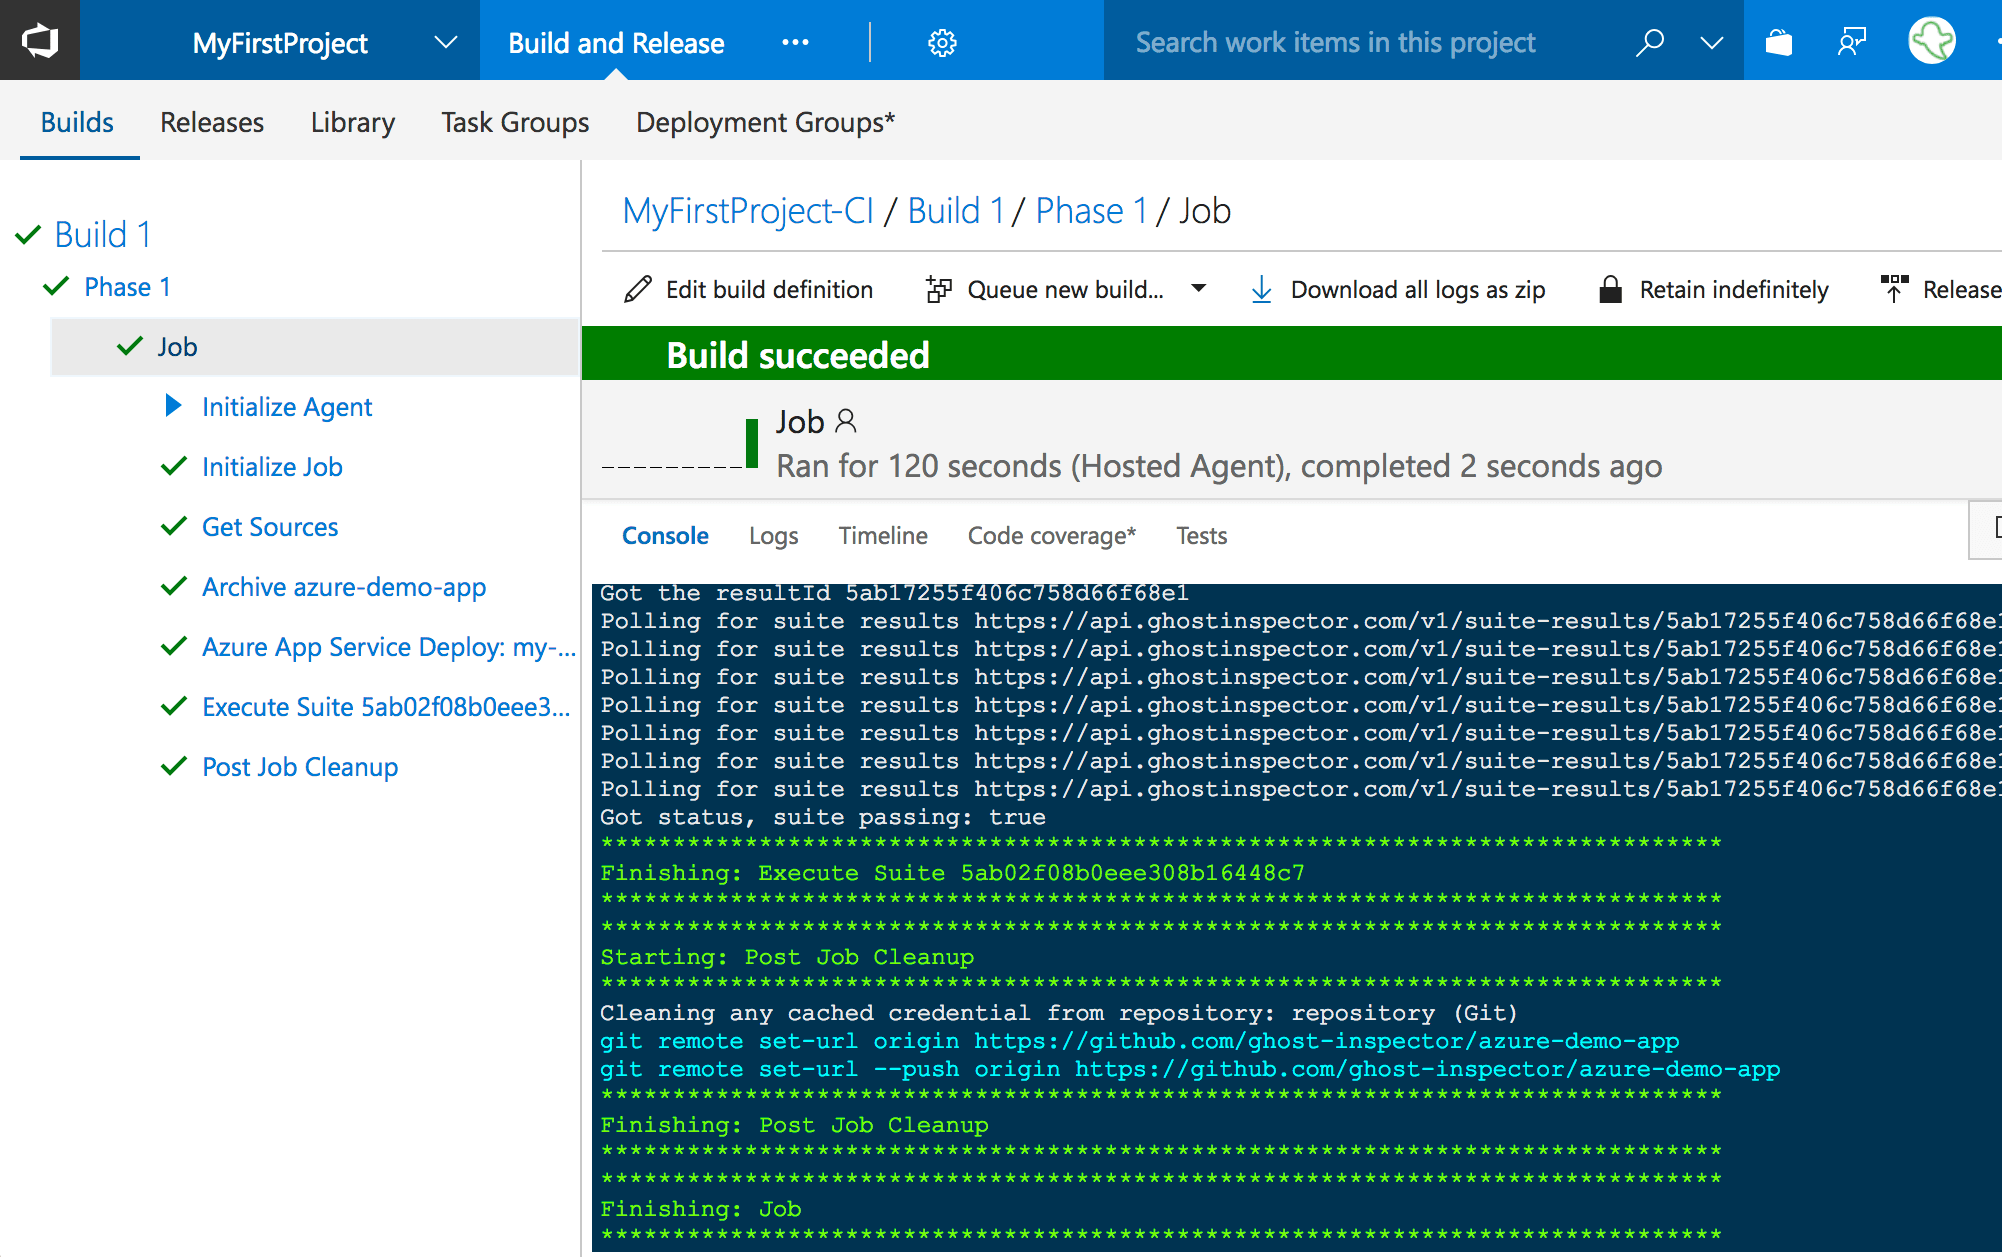
It looks like our first build passed!
Checking our test suite
Just for good measure I’ll go back and check on my test suite to see that it grabbed what was expected from the application:
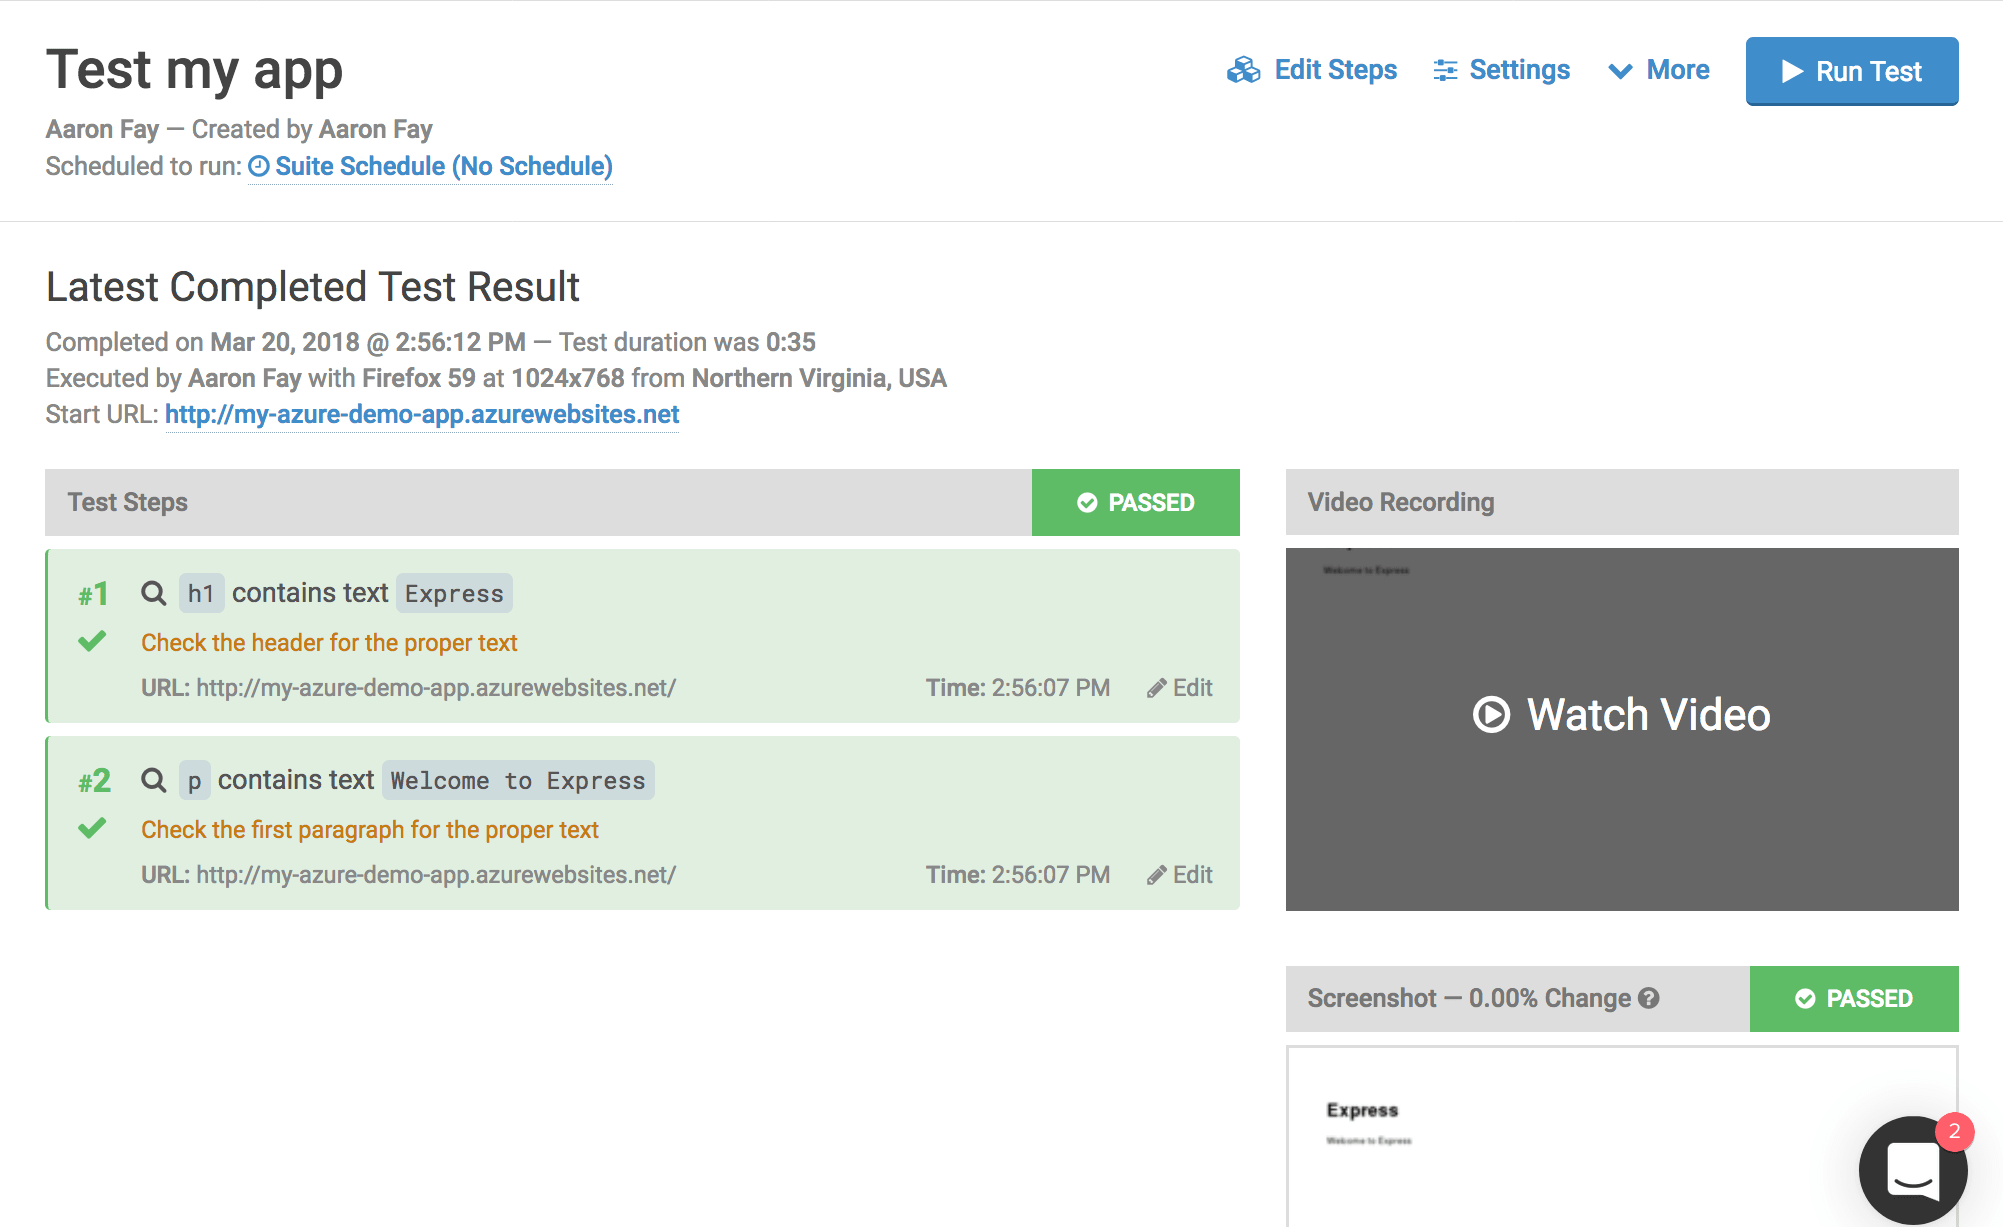
And there we go! We have successfully created a Node.js application, deployed it to Azure, and tested it using Ghost Inspector and Visual Studio Team Services build!
Troubleshooting and tips
This has been a pretty involved look at some advanced tools, if you run into trouble along the way, there are a couple things you can try to find out what’s wrong:
- Check the logs – application logging is not enabled by default in Azure, to enabled logging for your app, go to Diagnostic logs and set Application Logging to On. You will then see a log stream under Log stream, and errors will appear when you visit your application in the browser. This can be helpful when diagnosing cryptic HTTP responses.
- Check the Console – though a bit limited in functionality, there is enough features in the Azure application console to try a few things. Go to Console and once the terminal comes up, you can try
npm install .ornode serve.jsto see if there are any errors with your application. Also double-check that the proper version of Node is being run withnode --version, if everything is set up properly, it should be8.9.4(or whatever version you’re using). - NPM errors / permissions issues – I did run into a couple scenarios where I had changed a dependency in
package.jsonand I would get an error likeError: npm ERR! path D:\home\site\wwwroot\node_modules\.stagingor something similar in the log stream. Azure doesn’t give you permissions to thenode_modulesfolder, so I found that I could fix the problem by going to Application Settings > Application Settings, changing the version of Node.js underWEBSITE_NODE_DEFAULT_VERSIONto something different, Save, and then change it back and Save again. Although I couldn’t find an official reference to support this, my theory is that thenode_modulesfolder gets wiped out if you specify a new version of Node.js in the Azure Application Settings.
Wrapping up
That wraps up our post for today, we definitely hope this is helpful to you down the road should you happen to be trying to connect these services together, or just get Ghost Inspector integrated into your VSTS build.
As always, should you run into any issues along the way, feel free to reach out to our support team and we’ll be happy to assist you on your way.
Happy Ghosting!
